The One Flasher/Fly Combo You Must Have
* This page contains affiliate links. The Great Lakes Fisherman may earn a commission on items purchased through these links. For more on this, please click here.
Flashers and flies have been used for years as part of a salmon fishermen’s trolling spread. When the right color is used, the bright flash allows fish to see rig from many feet away, even in deeper water. And when they do, the darting movement of the fly chasing it is irresistable. But what is the best flasher/fly combo color combination to use?
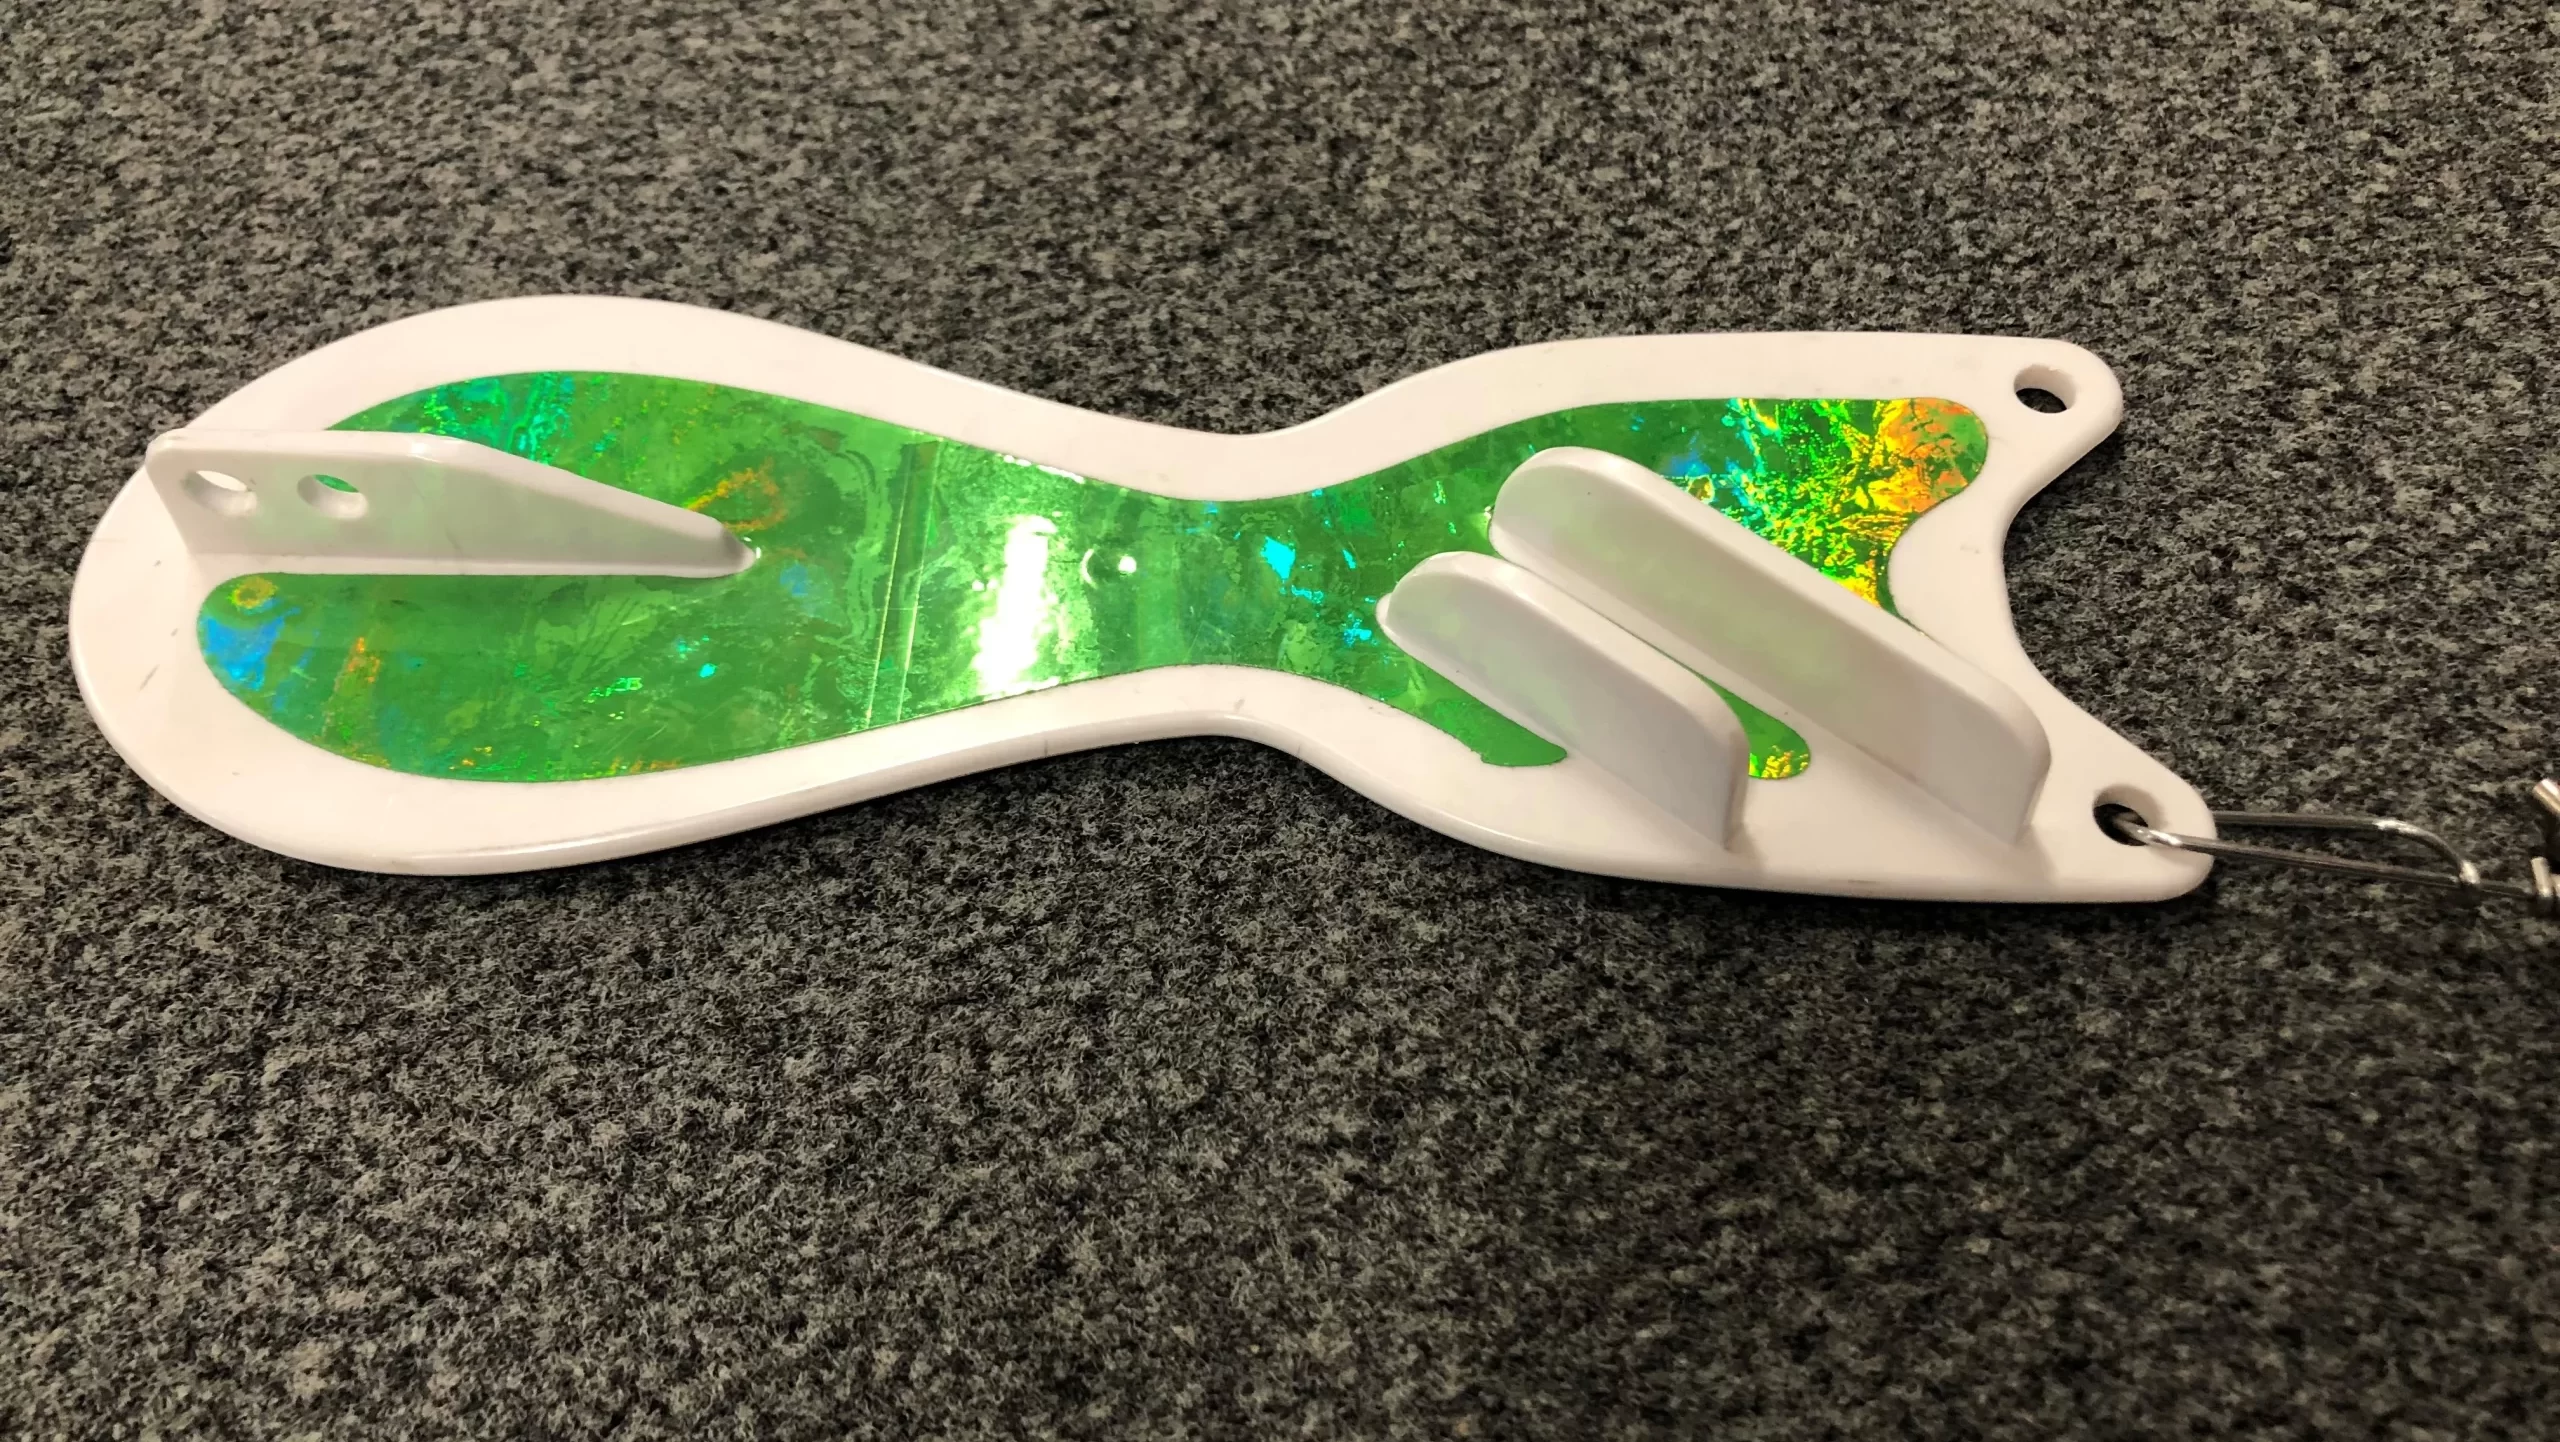
While there are many colors that can and do work, some work better than others in certain conditions. But if there was one color combo that you want to be sure is in your setup at all times what would it be? Well that’s easy. The one flasher combo I make sure I always have in my setup is a green spin doctor with a green/tinsle fly. Here’s why.
Green is the color that stands out most prominently in relatively clear and deep lake water. The reasons for this are a bit complex and for a full explanation, you can watch this video. But suffice it to say that green wavelengths from sunlight penetrate great lakes waters deeper than other colors. And because fish spend much of their lives swimming in this deeper water, the color green looks much more like what they’re chasing down there, than other colors. (Red for instance doesn’t show up at all in deep water).
Now don’t get me wrong, this is not to say that other color combinations won’t catch fish. They certainly will and I have caught many salmon on other colors. But green will usually outfish any other color combo out there, over time. It is especially effective when the fish are in the deeper water in mid summer.
If you don’t believe me, just pay attention to the color selections most tackle shops long Lakes Michigan and Huron carry. About 2/3 of them include green or hues of green as part of the color scheme. If you still don’t believe me, go to Dreamweaver’s website and sort their Spin Doctors by popularity.
As far as size goes, a lot of that depends on your preference and target species. I have found the 8″ model to be a great size for all species, but pick whatever size you find works best for your setup.
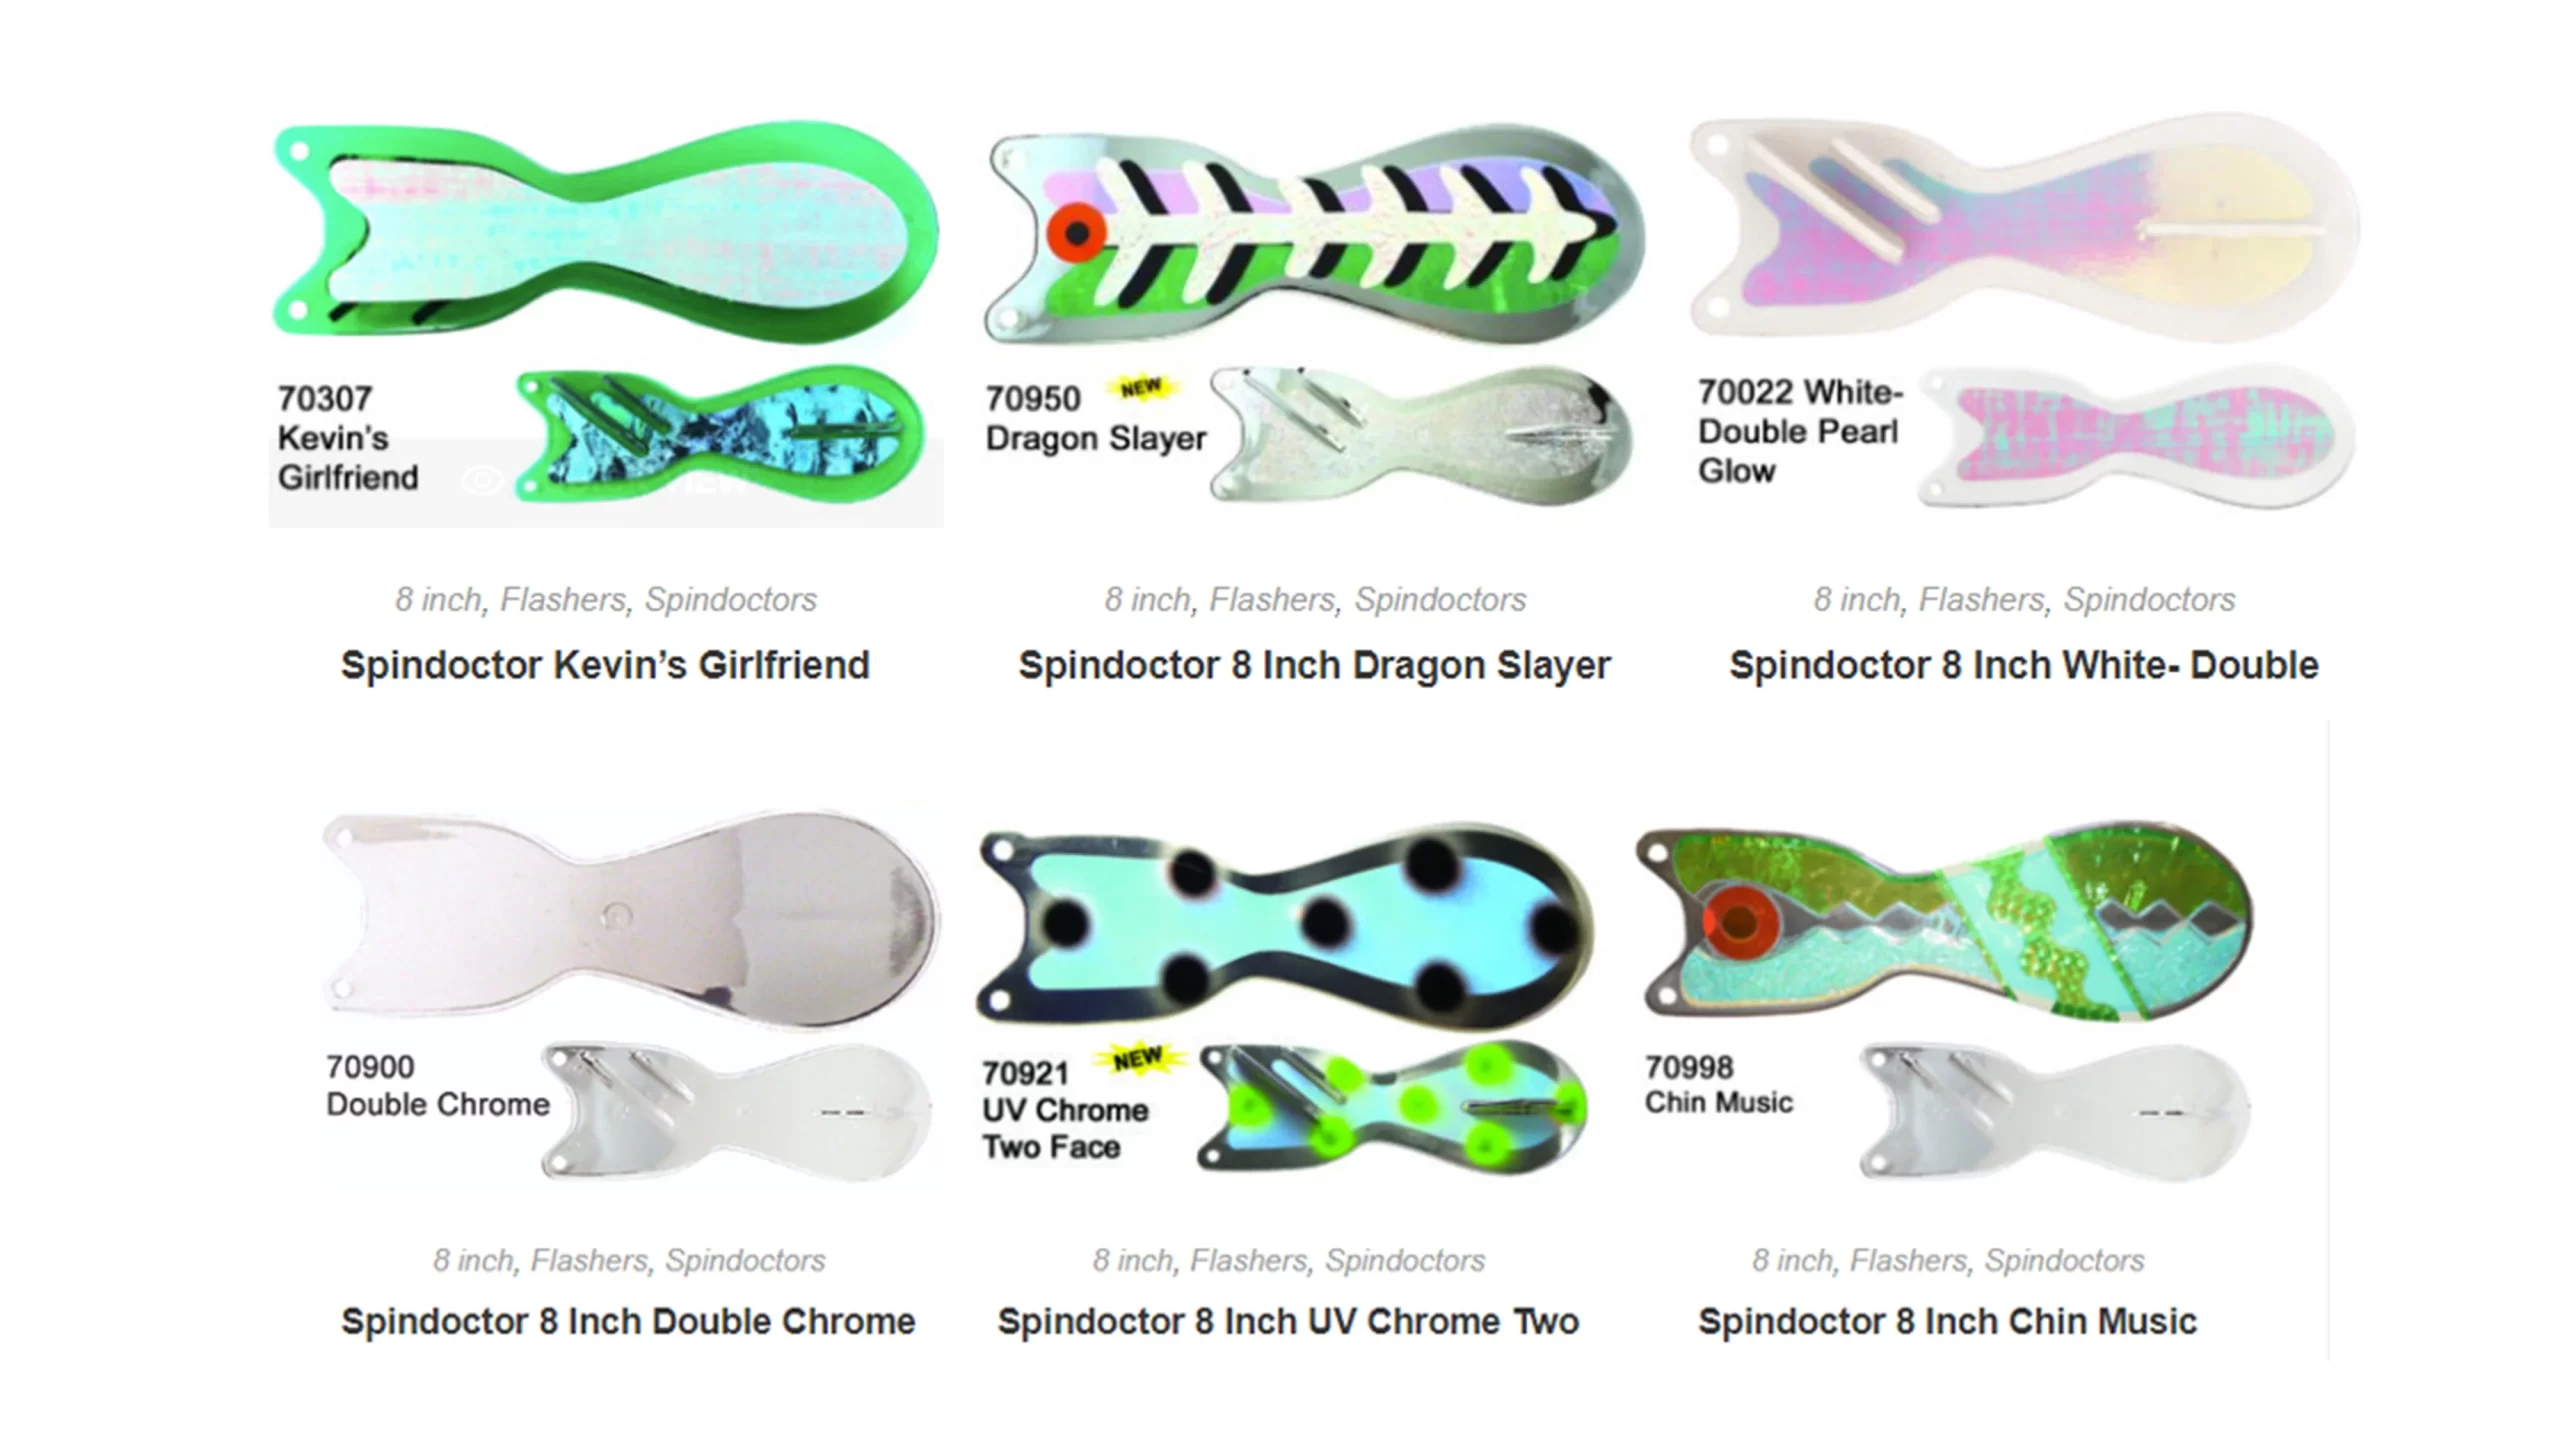
Now as far as which exact pattern works best, that’s less important than the color, in my opinion. We have had a lot of success with various patterns. The important thing is that it include green as a the main color. Some great options are:
Kevin’s Girlfriend
Dragon Slayer
UV Green/Yellow
The fly running behind the Dipsy should also be green but with some tinsel or flashabou mixed in. The flash will help keep the fish focused on the fly. This has, by far, been the best flasher/fly combo I have ever used.
In addition, I have found that the best color for Dipsy divers is, you guessed it, green. When running these flasher/fly combos on Dipsy rods, we always run them off of a green dipsy. I have 4 of these on my boat and can run both High and Low Divers using this color. If you don’t feel the added green helps, use a black Dipsy.
So give green a try. Keeping at least one of these setups in your trolling regimen is almost certain to improve your catch rate.
Early Spring Fishing on Lake Michigan
* This page contains affiliate links. The Great Lakes Fisherman may earn a commission on items purchased through these links. For more on this, please click here.
If you’re getting cabin fever and looking for something to get you out of the house, why not try some early spring fishing on Lake Michigan? With the winter ice all but gone, the shores of the lake are heating up both literaly and figuratively. And although some days can still be quite nasty out, there are often some really nice days sprinkled in. So here are a couple of ways you can get out and take advantage of some of what Lake Michigan has to offer this time of year.
Before we get into it, just a quick word of warning. Lake Michigan is very cold this time of year and there are not nearly as many boats out to help you if you get into trouble. So be sure that you don’t go alone and that you have good communication in the event of an emergency. And as always, make sure all of your boat’s safety gear is up to par. With that said, let’s get into it!
Pier Fishing
Once the ice is clear, you’re almost certain to find anglers on almost any given pier or jetty on the nicer days. These anglers are often chasing steelhead, espeicially on piers that are at the mouths of major tributary rivers.
Using fresh spawn is usually the bait of choice either suspended under a bobber or drifting near the bottom. The bottom rig typically consists of a pyramid weight sliding on the mainline, a barrel swivel, a 3-6′ leader and finally, a hook with the spawn bag. The spawn bag here should have a few foam beads mixed in to provide buoyancy and keep the spawn off the bottom.
Another common method of pier fishing is casting spoons. Little Cleo’s or other heavy spoons of various colors and glow-in-the-dark varieties are thrown around these pierheads to attract steelhead and young salmon looking for an easy meal.
Trolling the Beaches
If you have a boat, another popular way to enjoy a nice late winter day is to troll for salmon & trout along the beaches. And when I say beaches, I mean it. This time of year, the fish come very close to shore to take advantage of alewives and other bait fish that are concentrating in these warming waters.
It is not uncommon to to find fish in less than 20 FOW during late winter/early spring time period and once you find a pattern, you will often find a fast limit. And if you like salmon, these are sure to be some of the best tasting you will ever eat.
Perch Fishing
And last, but certainly not least, is the phenomenal perch fishery that the southern part of the lake has to offer.
But be aware that unlike some of the other perch hotspots in the Great Lakes, such as the western basin of Lake Erie or Lake St. Clair, perch in Lake Michigan can sometimes be found quite deep. And when I say deep, 70′ is not uncommon.
When fish are found at this depth, especially when the water is cold, the bite can be very difficult to detect. It is advised to use braided line in these instances as it’s low-stretch characteristics will telegraph the bite to the rod much better.
Whatever you choose to do on Lake Michigan during late winter and early spring, it’s sure to be the cure for your cabin fever.
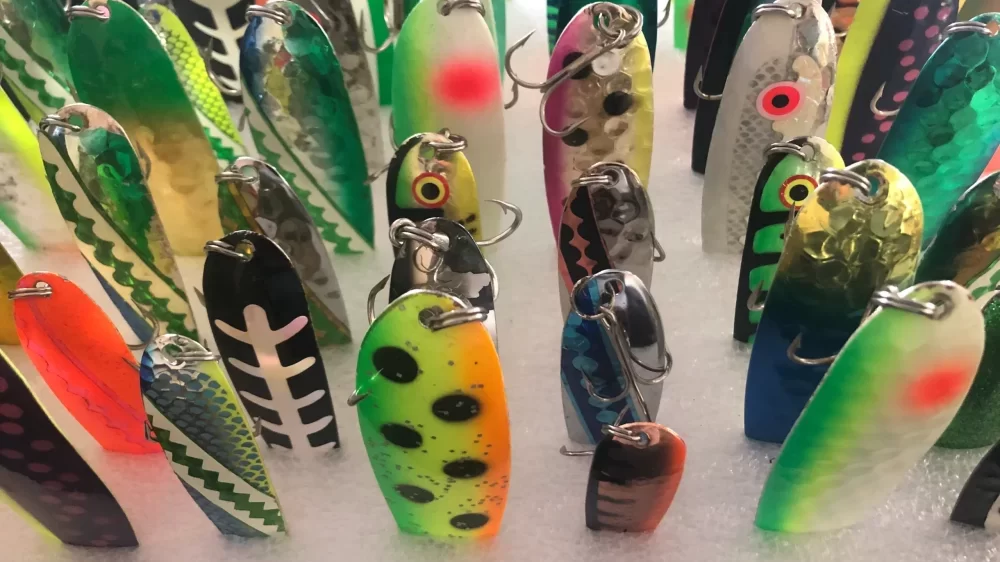
Trolling Spoon Storage
* This page contains affiliate links. The Great Lakes Fisherman may earn a commission on items purchased through these links. For more on this, please click here.
There are storage trays of all shapes and sizes to accommodate all styles and sizes of spoon. But these boxes are typically designed to maximize space. This is great for storing a lot of spoons in small places, especially when space on a boat is at a premium. However, there are a couple of disadvantages to this.
First, when the spoons are jammed together in a tackle tray, they tend to get scratched. The sharp hooks will do a number on the paint job of the spoons each and every time you are moving. Think about how much time that tackle is bouncing around both down the road on the trailer as well as the entire time out on the water. This will lead to having to repaint or replace them much sooner than you would need to otherwise.
The second disadvantage to this is that when these spoons are jammed together, it can be difficult to find the color combo you are looking for. We all know how frustrating it can be when our spoons are stuck together in clumps and we’re trying to sort through them to find the right one. There has to be a better way, right?
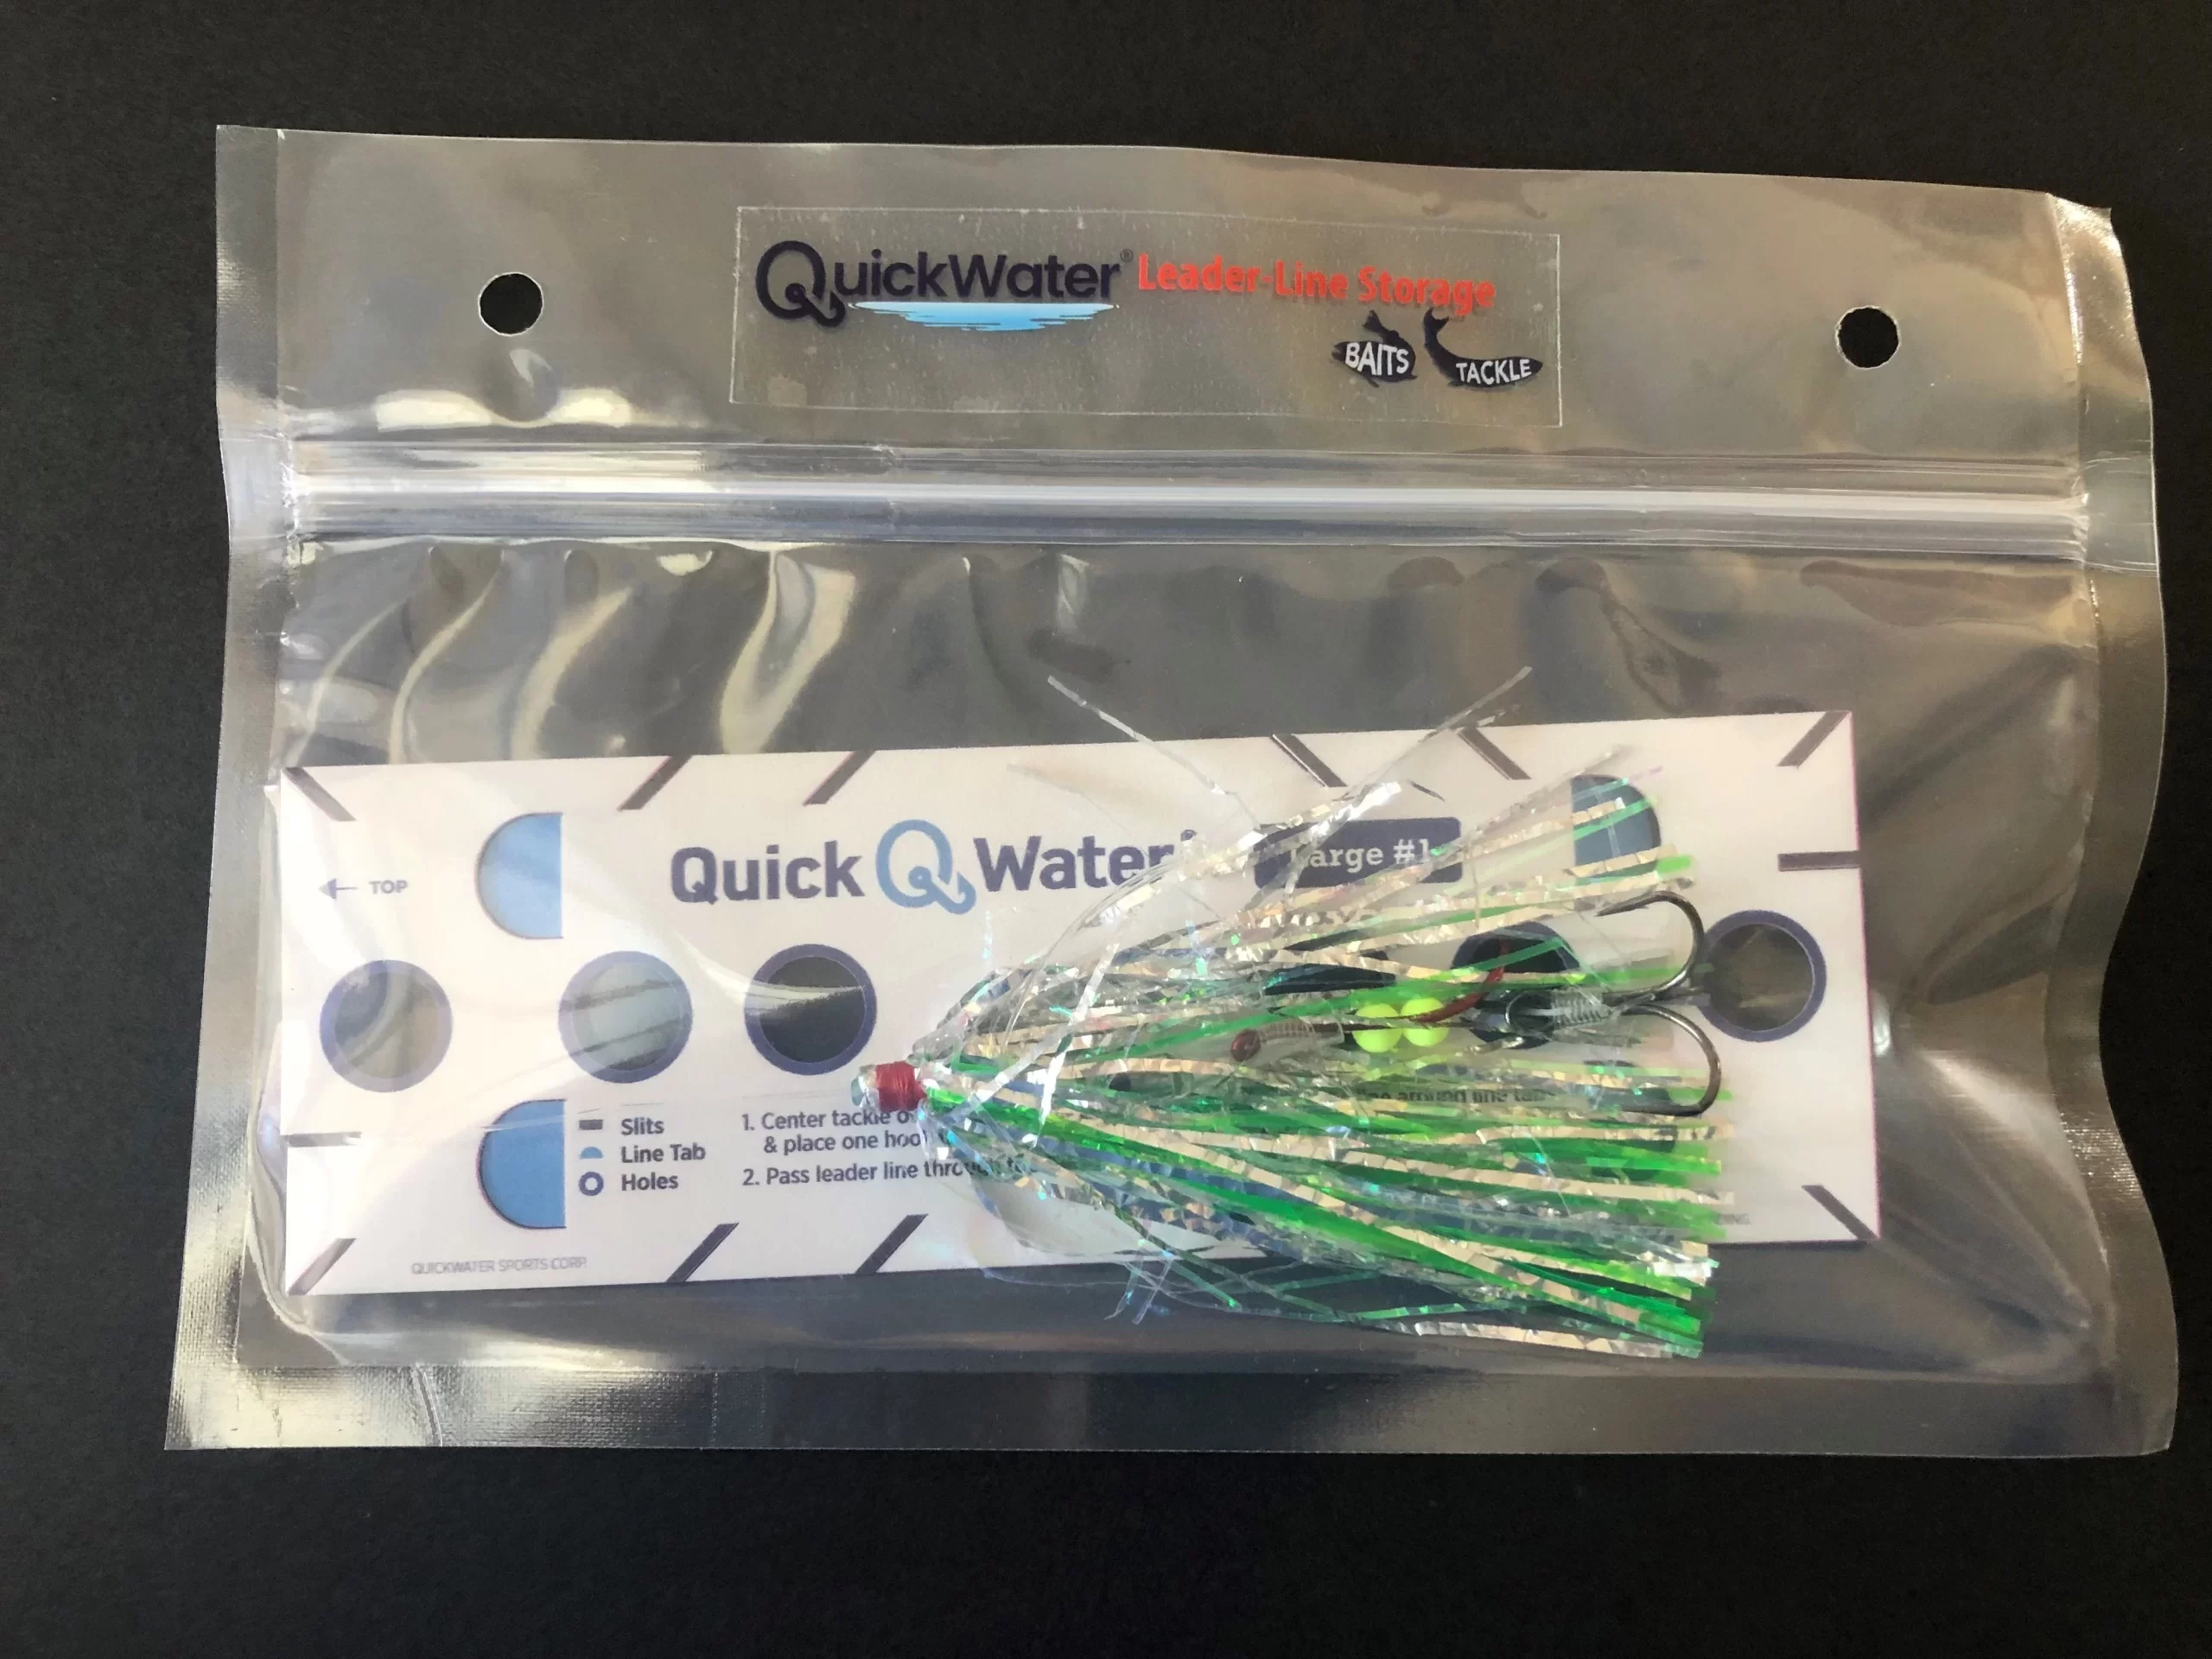
Here, I will go over our favorite way to store our trolling spoons. While it takes up a bit more space, it keeps the spoons from scratching each other as well as making it super easy to find the color combo you’re looking for quickly. All you will need is a storage tray that is deep enough to store the spoons vertically (about 6″ deep) and some polyethylene foam (or some other sort of high density foam material).
Step 1: Get a Sheet of Foam
A sheet of polyethylene foam can often be salvaged from heavy duty packaging. If you don’t have any from a recent delivery, you can purchase a sheet of it online. Polyethylene is what pool noodles are made of and is what we prefer, but any type of tough foam should work. We prefer a sheet that is 2″ thick, but you can probably get away with a little less.
Step 2: Choose a Storage Tray
The storage tray can be sized to fit your needs. The one we use is about 16″ x 23″. This holds our entire collection of spoons. Admittedly, we have a modest collection of spoons (about 100), and the tray size you select should accommodate your space/storage space. For handling, we don’t recommend a tray much larger than this, but you can always get a second or third tray, if necessary.
Step 3: Cut the Foam
First, simply cut the foam to fit the bottom of the tray. Next, cut a gridwork of slits in the foam to accommodate your spoons. The slit should be slight less than the spoon width so that you get a tight fit. Remember, you can always cut more, but you can’t cut less!
You should space them according to the sized spoons you will be storing. For salmon, we mostly troll magnum spoons, so we spaced each slit about 1.5″ apart in both directions. At 1.5″ spacing, we get about 56 magnum spoons per square foot. This equates to over 140 spoons in the 16″ x 23″ tray! Of course, they can be spaced closer together for smaller spoons allowing room for even more spoons. Optionally, you also can secure the foam to the bottom of the tray using a few pieces of double-stick tape, although, we did not find this necessary.
Step 4: Install LED Blacklight Strip Tape
To allow your glow-in-the-dark spoons to be activated and ready to go when you reach the fishing grounds, consider installing some LED blacklight strips in the inside of the lid. The power cord can by run through a hole punched in the lid, or simply run in between the lid and container (just be sure not to pinch it). These can then be rigged to plug into your boats 12 VDC to allow your glow-in-the-dark spoons to activate while you are in transit!
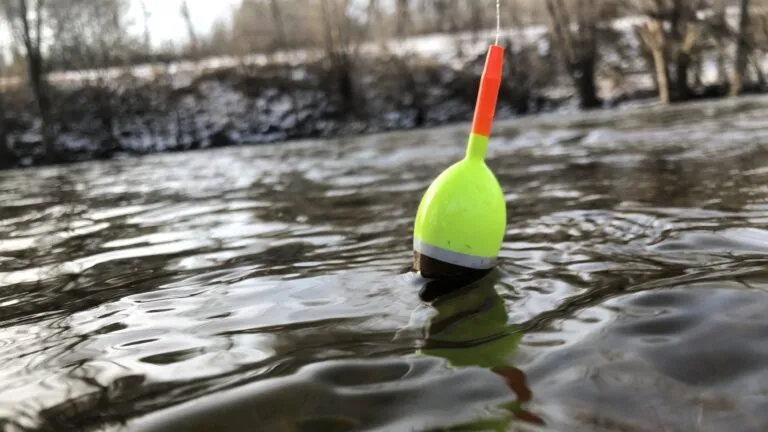
Bobber Fishing for Steelhead
* This page contains affiliate links. The Great Lakes Fisherman may earn a commission on items purchased through these links. For more on this, please click here.
I like to fish without a guide. That’s part of the draw of fishing to me, figuring things out. Nothing teaches you about fish behavior better than good old trial and error. But after years of not being a very good steelhead fisherman, my brother talked me into going on a guided trip on the Muskegon River. Having that experience made me appreciate the value of a guided trip every now and then. Here, I will share a few of the tips I learned while bobber fishing for steelhead.
The Bobber Rig
Before we continue, it is important to remember the goal of the technique. The goal, as with any type of fishing, is to put something that the fish believes is food in a place that the fish can see, smell or feel. The problem with steelhead, is that they are very finnicky. And in clear, shallow streams, it’s very bright under the water and they easily notice the slightest discrepancies between real food and bait on a hook.

Therefore, in using this technique, we must make sure that our presentation is perfect. This means not only giving the fish something they want to eat, but making sure that the food looks normal in its environment. In moving water, this is not as easy as it might seem. But the tips that we learned ensured that our presentation was as good as it could possibly be.
To be clear, the techniques below won’t work if fish aren’t present. This article will focus on the technique used to catch the fish and not on locating steelhead. For our purposes, we will assume that you are fishing a run of water that holds fish.
1. Use a Flourocarbon Leader
Most rivers that hold steelhead tend to be clear. And because the water is so clear, the fish tend to be extremely line-shy. This makes a flourocarbon leader a must.
Transparent materials bend light to some degree. A measure known as the refraction rate indicates how much the light will bend. Flourocarbon has a refraction rate that is very close to water. This means that it is more difficult to see under the water than any other type of fishing line. In fact, I recommend flourocarbon when fishing any clear body of water, regardless of the target species.
2. Keep the Bait on the Bottom
While in the river, the steelhead tend to hang out near the bottom. This is where a lot of food tends to tumble downstream. The length of the bobber rig we used on this guide trip was continually adjusted based on the depth of water in the run of the river that we were fishing. The goal was to have the bait occasionally bump the bottom to assure us that the bait was where the fish were. If the bobber just twitched occasionally, we knew we had it right. If the bobber was continually twitching and leaned forward, it was a sign that the rig was dragging on the bottom and we adjusted our length/weight until we got the twitch pattern we desired.
3. Keep Your Line Out of the Water
This was by far the most interesting thing that I learned on our trip. Our guide was constantly monitoring our lines between the rod tip and the bobber and if that line touched the water, we heard about it. This was one of the most important aspects of the technique and our guide said it could make the difference between a limit of fish and getting skunked.
The reasons for his concern make sense, when you consider what is happening under the water. In order for the bait to look natural, it must be flowing with the other debris that is flowing along the river bottom. If the line between your rod and the bobber lays in the water, the water will pull the line (and thus your rig) downstream faster that it would go naturally.
To better understand this, let’s take a look at the flow profile of a river or stream.
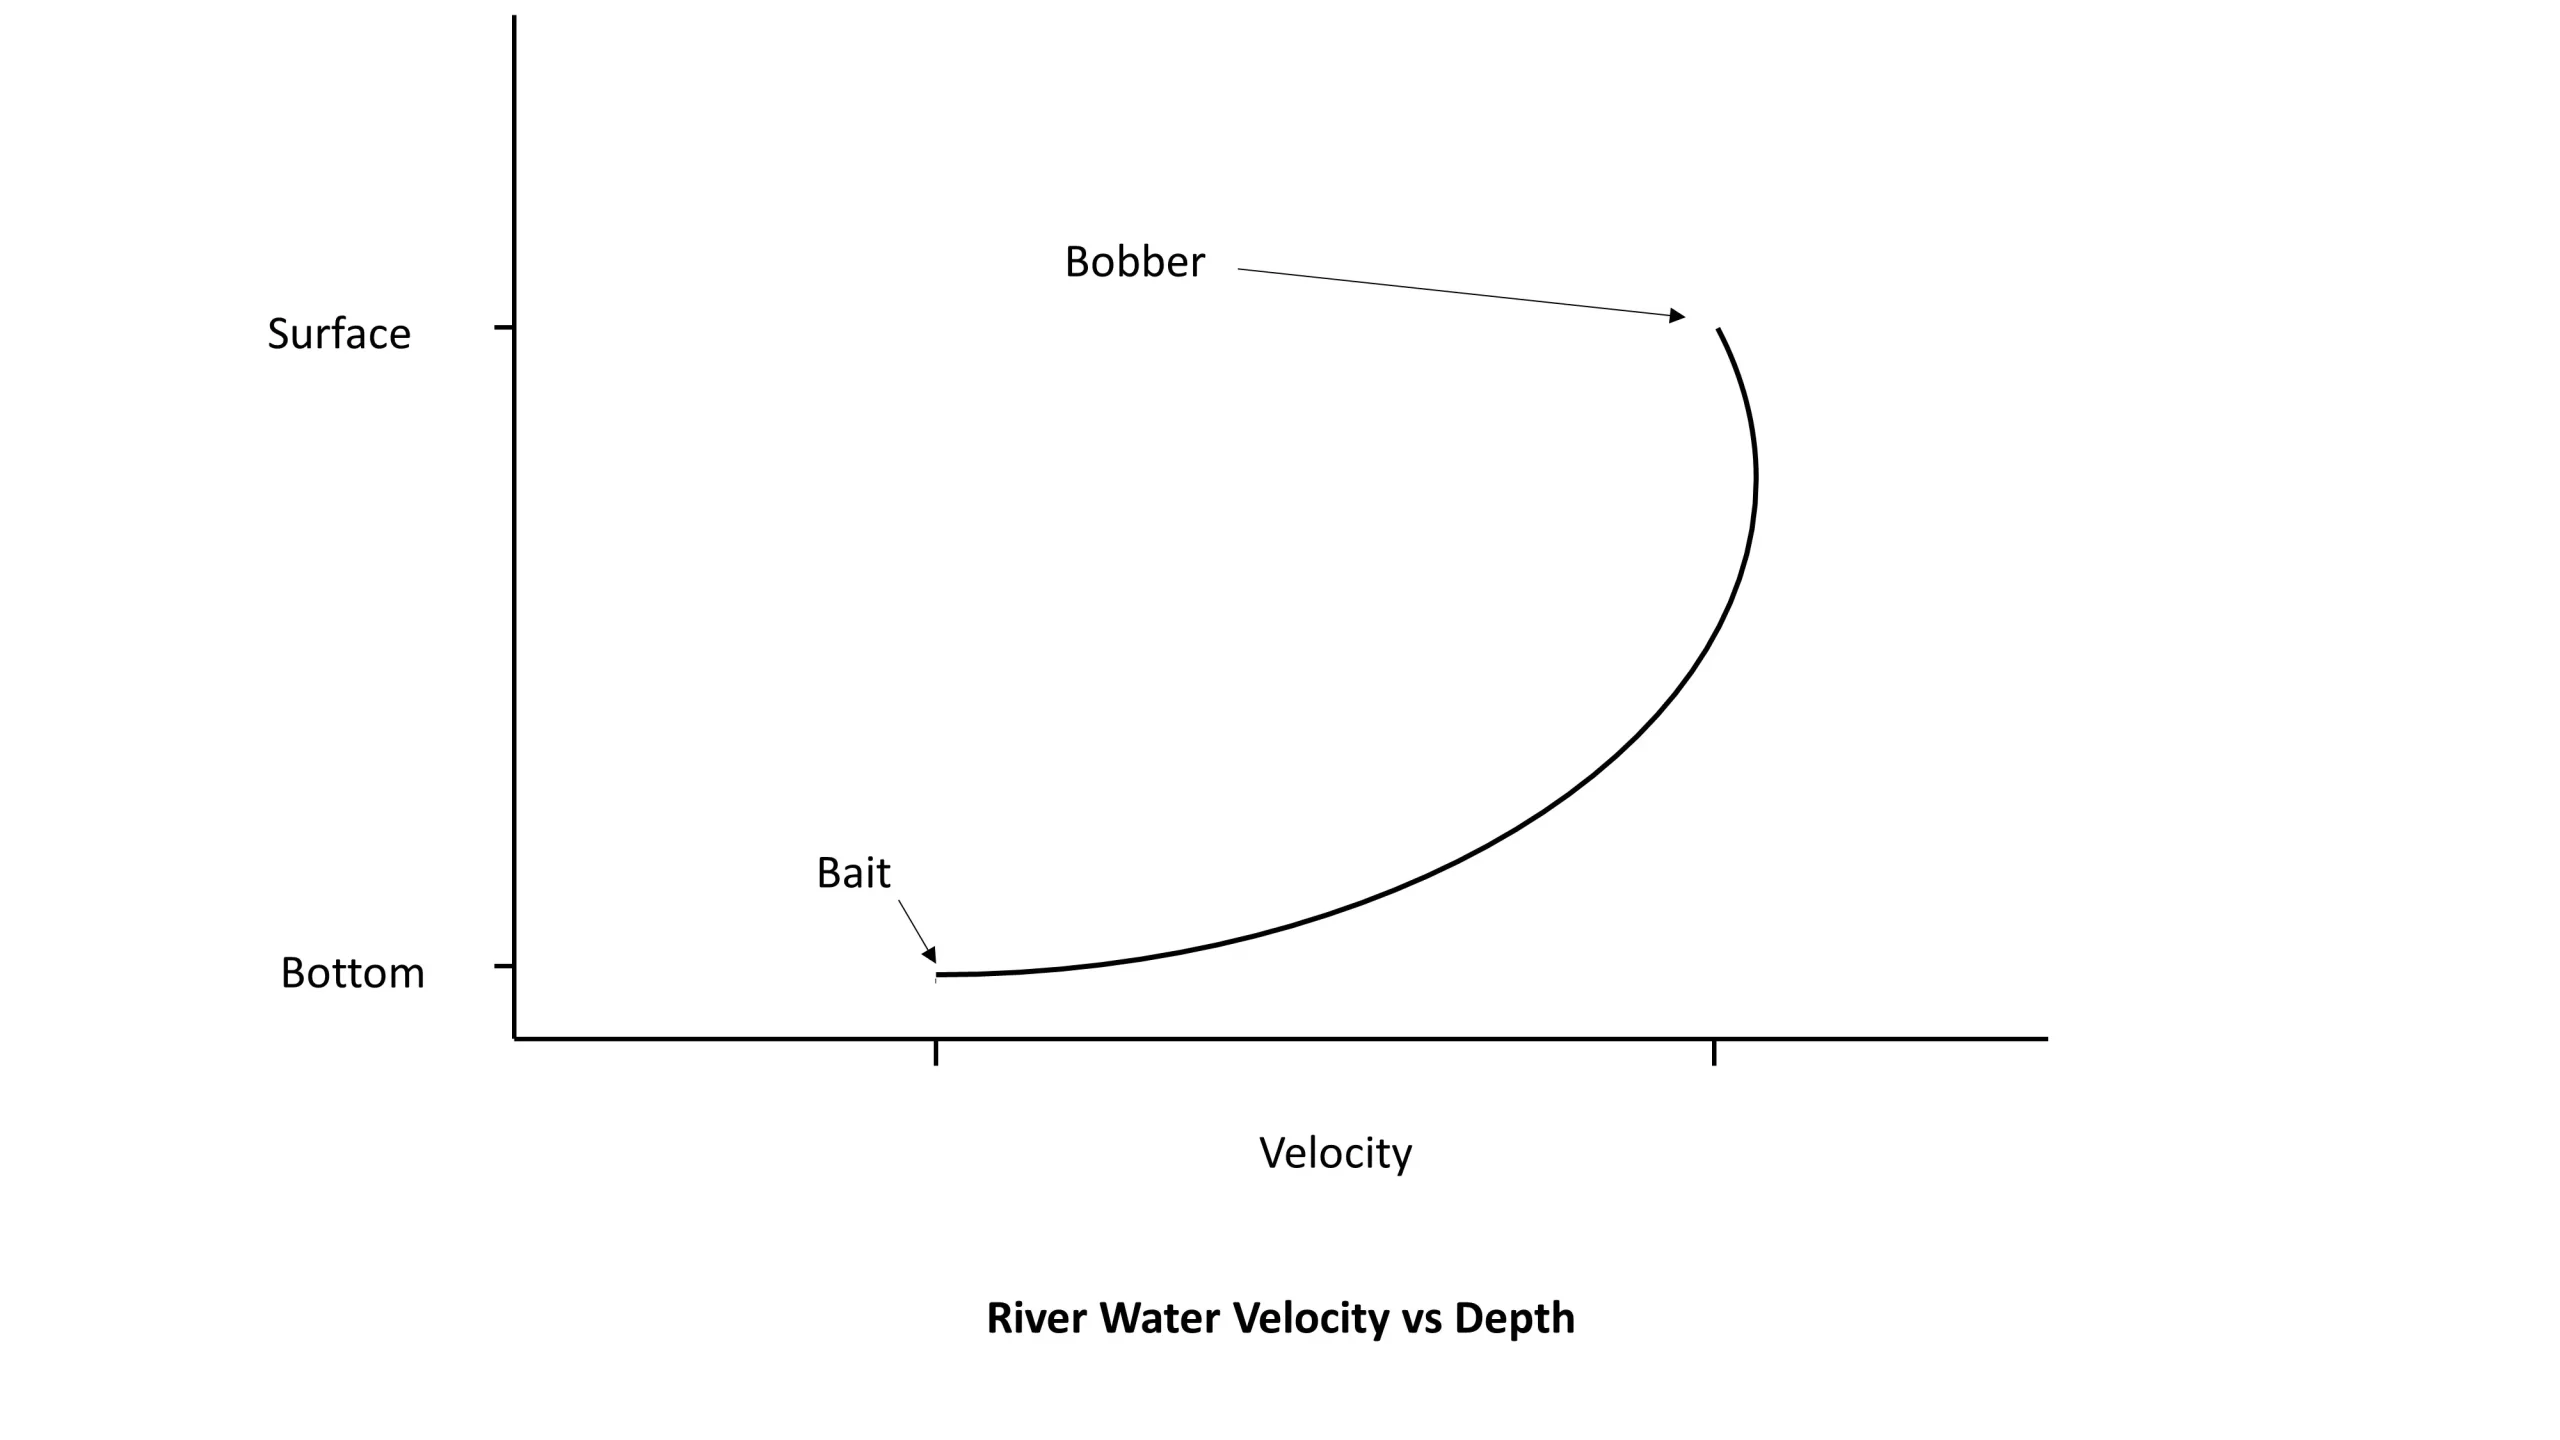
We can see that the river’s peak velocity tends to be located just below the surface, while the velocity near the river bottom is much lower. The water velocity translates into force on our fishing line. The higher the water velocity at a given section of our line, the more force on that line. This velocity profile pulls a bow in the line ahead of the bobber which will cause the bobber to lean back as long as the bait/weight is not dragging on the bottom.
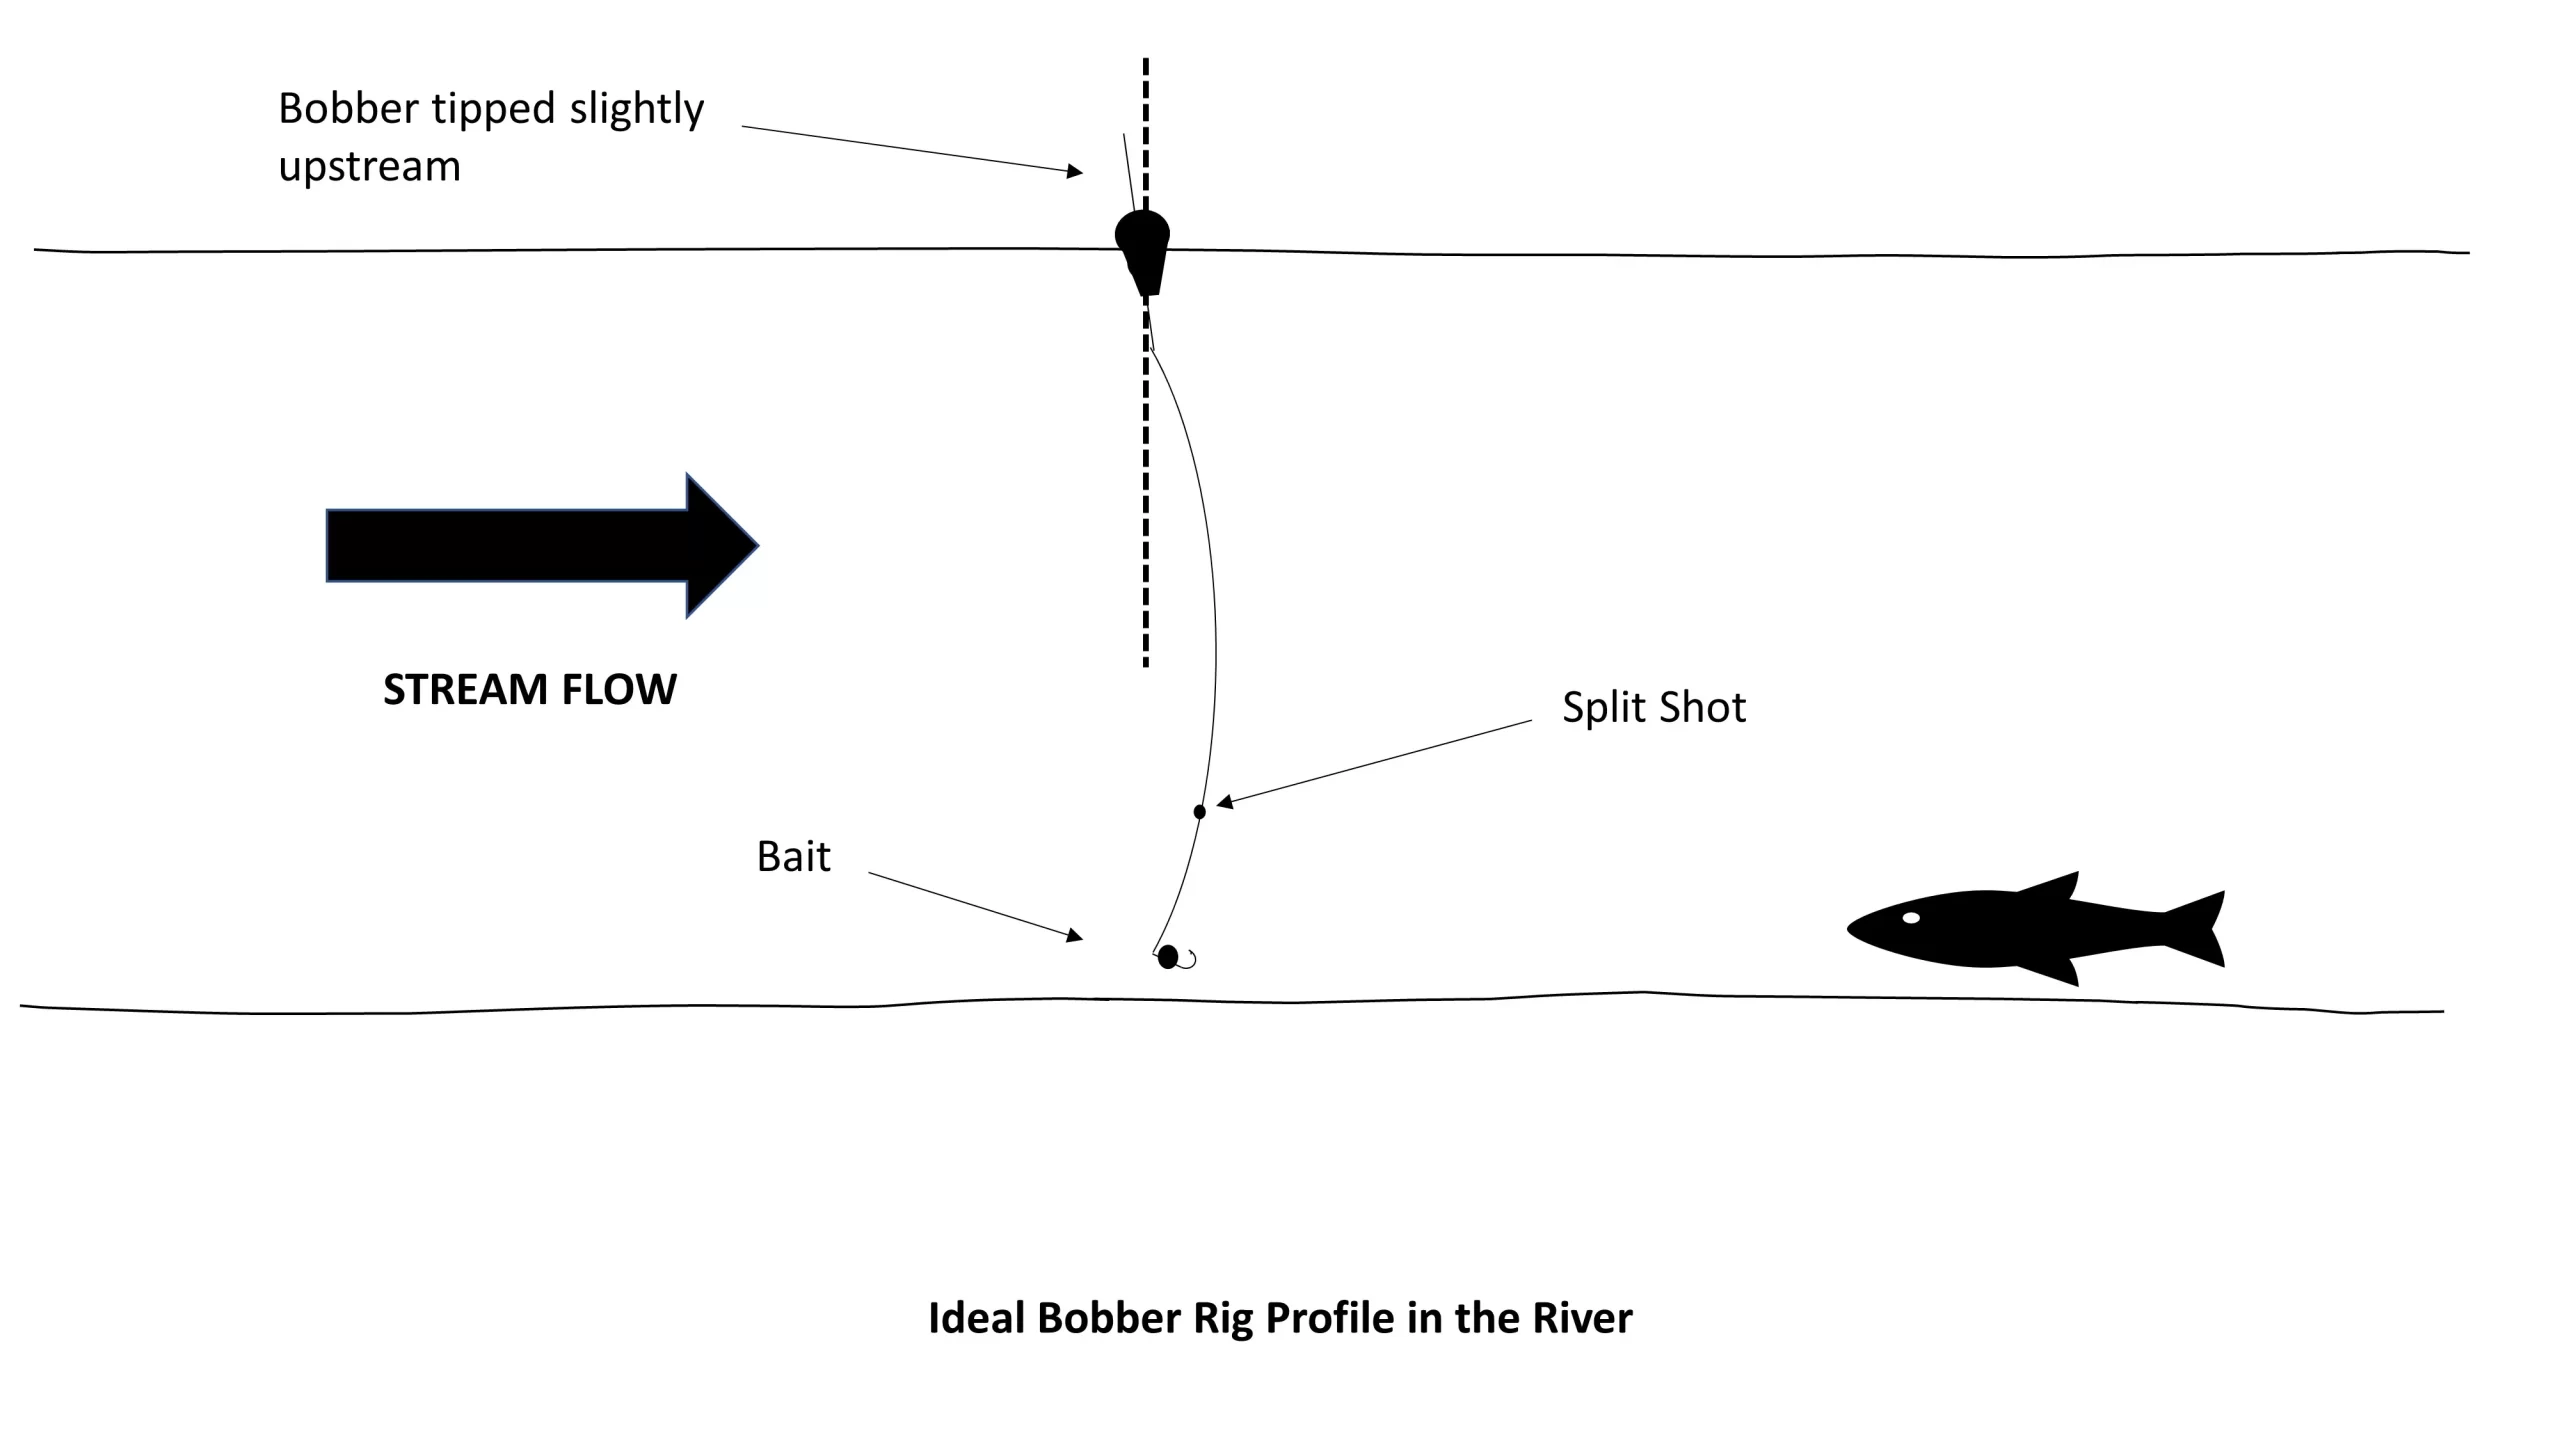
However, if the bait is dragging the bottom (see below) the top of the bobber will tend to tilt downstream. This is an indication that you have too much line out or too much weight on the rig. A bait that is dragging is moving too slow relative to the rest of the debris in the current and your odds of getting bit go down significantly.
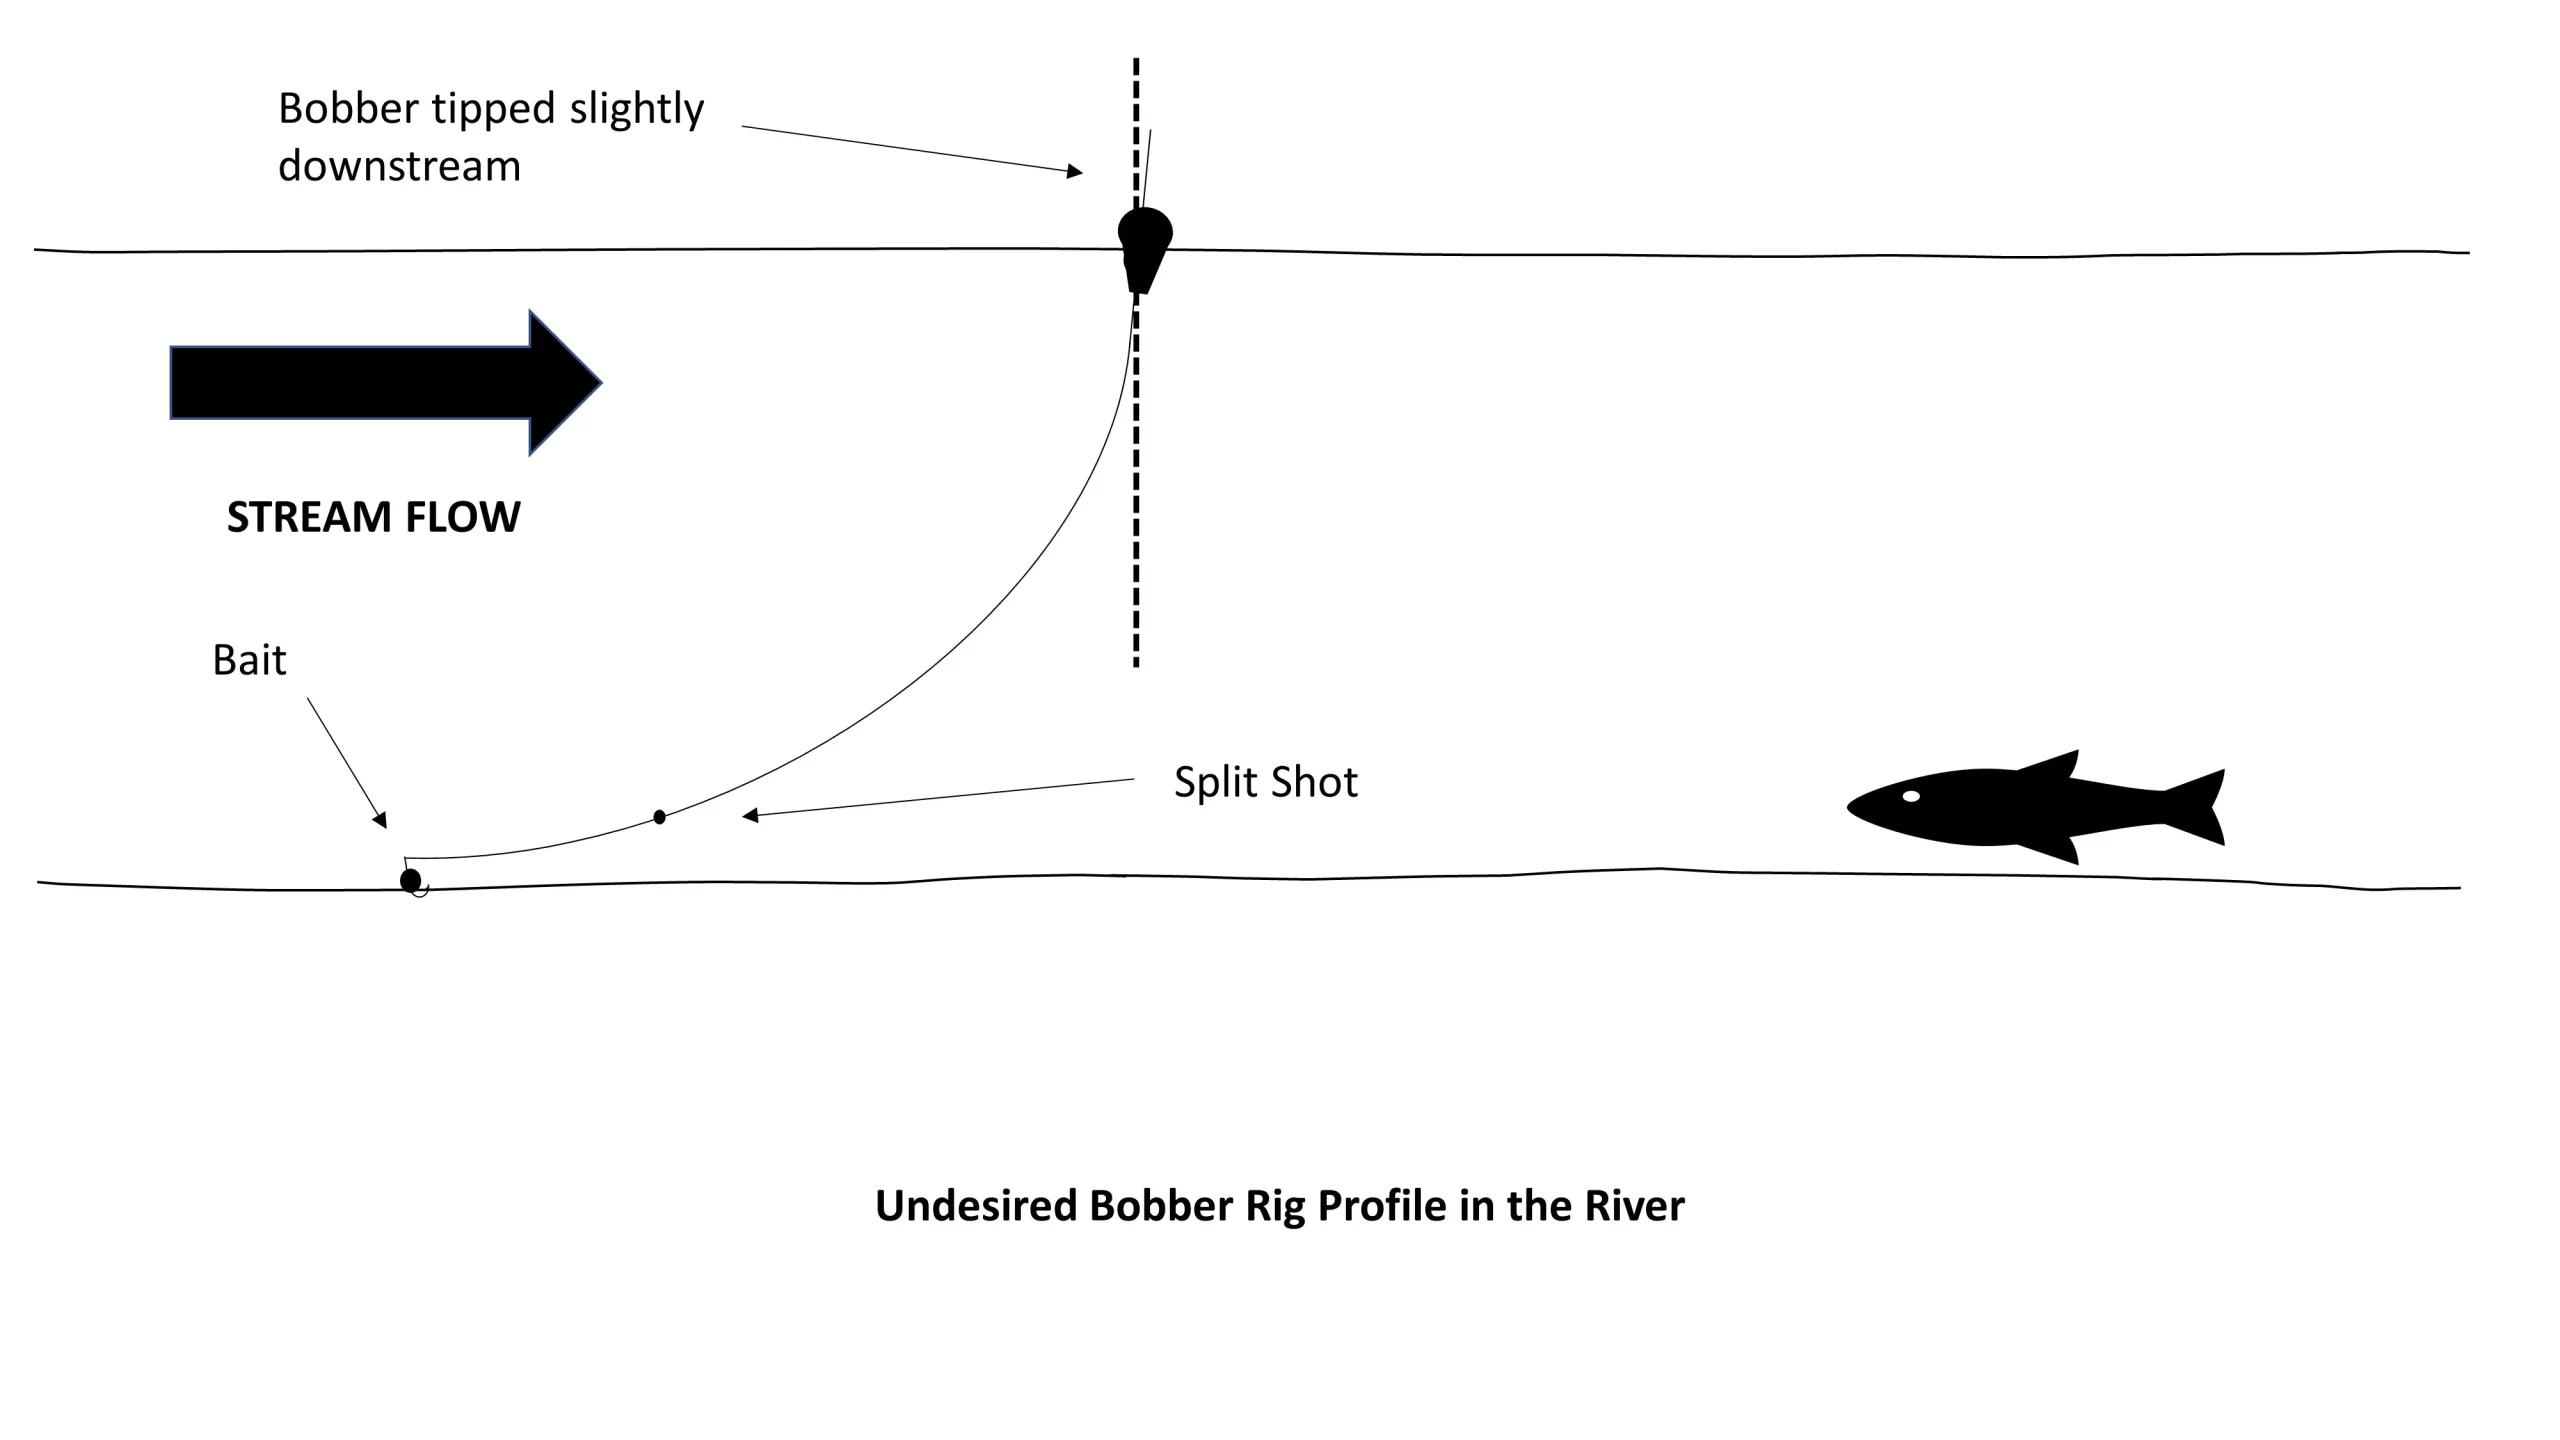
The bottom line is make sure the line runs tip to bobber throughout each and every drift!
4. Use Egg Patterns During the Spawn
When approaching any fish, the key is always knowing what they want to eat. For steelhead during the spawn, the answer is simple. The river is full of fish eggs. There are so many fish eggs in the river, that the fish really don’t need to focus on much else. That’s not to say that they won’t, but using egg patterns is a great first choice when fishing during the spawn. If the stretch of river you are fishing is void of eggs, you may need to switch to something else like waxworms or flies. But very often, egg patterns or spawn bags is all you will need.
If you try this technique, drop a comment below and let us know how it goes. We’d love to hear from you!