Livescope…Yes, It’s Worth It!
* This page contains affiliate links. The Great Lakes Fisherman may earn a commission on items purchased through these links. For more on this, please click here.
There’s been some debate on the use of livescope technology. Does it really help you find fish quicker? Does it help you catch fish faster? Is it worth the money? And to all of these questions, I would answer with a resounding yes!
This, of course, doesn’t mean that everyone should go out and buy a livescope unit. In fact, I would not recommend that you do so unless fishing is a pretty serious part of your life. But there are reasons why it makes sense, even financially, if fishing is something you love to do, not just even if, but especially if you don’t get to go very often.
Before we go on, I want to point out that while I am using the term livescope generically, the term is actually the name of the Garmin version of live sonar. But because that is the widely used term for the technology in the industry, I am using it here in the generic sense. When referring to the Garmin version, I will use the term, “Livescope” with a capital L.
Should You Buy Livescope?
The first thing you should think about is how much you like to catch fish as compared to how often you get to fish. If you love to fish, enjoy the pursuit of finding them organically, and have lots of time to do so, livescope may not be for you, especially considering its high cost.
But if you don’t have a lot of time to fish each season, but really value putting fish in the boat, especially if you enjoy keeping them for table fare, then livescope is highly recommended. Now you may think it’s cost prohibitive, but it’s not as bad as you may think.
First, think about all of the fishing equipment you have purchased over time. A fishing boat is probably the most expensive piece of equipment you’ve ever purchased for fishing. It gives you the flexibility to go where the fish are, right?
But as the old saying goes, 90% of the fish are in 10% of the lake. So if you leave it to random chance, you’ll spend 90% of your time not finding many fish. If you only get to go fishing a handful of times each summer, that’s not very good odds, unless you tend to fish the same body of water over and over again.
Now of course, there is traditional sonar which most boats and fisherman have. So this gives you a reading when fish are under the boat. This is great in deeper water where the fish aren’t easily spooked. But what about the ones that are off to the side?
Well, for that, there is sidescan technology. This can help with seeing fish off to the side, but sidescan has its own limitations. The sidescan will tell you that there are fish there, but it won’t tell you if those fish came from the area under your boat and were spooked to the side of your boat. And we all know from experience that spooked fish are not that likely to bite.
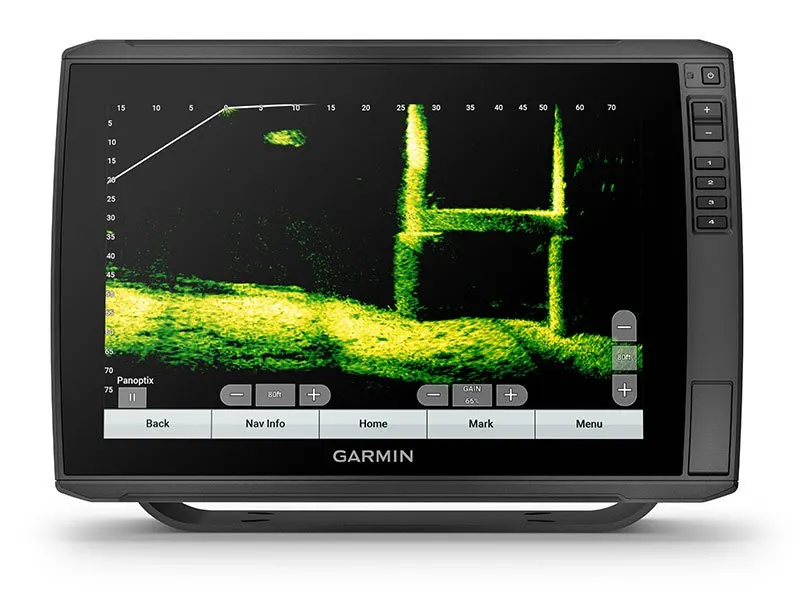
But with livescope, you have the ability to watch the fish reacting to these scenarios. I have been out spider rigging for crappie and watched schools of them scatter just shortly before my baits actually reach them. This is invaluable information to a fisherman in real time. With this knowledge, I can change my approach to casting, which allows me to reach the fish without spooking them.
Finally, electronics on boats tend to have a long lifespan. When you buy your first unit, the bells and whistles of any future enhancements won’t compare with the advantage you gain from just being able to see the fish’s behavior on the screen in real time. So if you never want to upgrade, you won’t be missing much.
So Which Unit to Buy?
Like all things, this is really a matter of cost and preference. Watching them on demo mode at a store like Bass Pro Shops or Cabela’s will give you a good idea of how the unit looks and feels. Lowrance, Humminbird and Garmin all have their own versions.
Personally, I chose Garmin Livescope and can tell you that I have zero regrets. The unit has been very reliable and consistent in it’s performance. I paired it with a Garmin 12″ head unit. The large screen makes it very easy to see, even on bright sunny days, without straining.
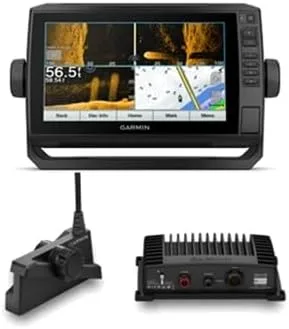
At the time I bought mine, the total cost for the head unit and the Livescope transducer was about $4500. If I were buying today, I would probably purchase this bundle from Amazon. This provides you with a 9″ display head unit and their latest Livescope Plus transducer.
If fishing is something you really enjoy, but are frustrated with coming up empty handed on the few trips that you make each year, or if you’re just frustrated in general with not being able to catch fish that you know are there, consider a livescope unit. You will never regret the purchase!
Trolling Spoon Storage
* This page contains affiliate links. The Great Lakes Fisherman may earn a commission on items purchased through these links. For more on this, please click here.
There are storage trays of all shapes and sizes to accommodate all styles and sizes of spoon. But these boxes are typically designed to maximize space. This is great for storing a lot of spoons in small places, especially when space on a boat is at a premium. However, there are a couple of disadvantages to this.
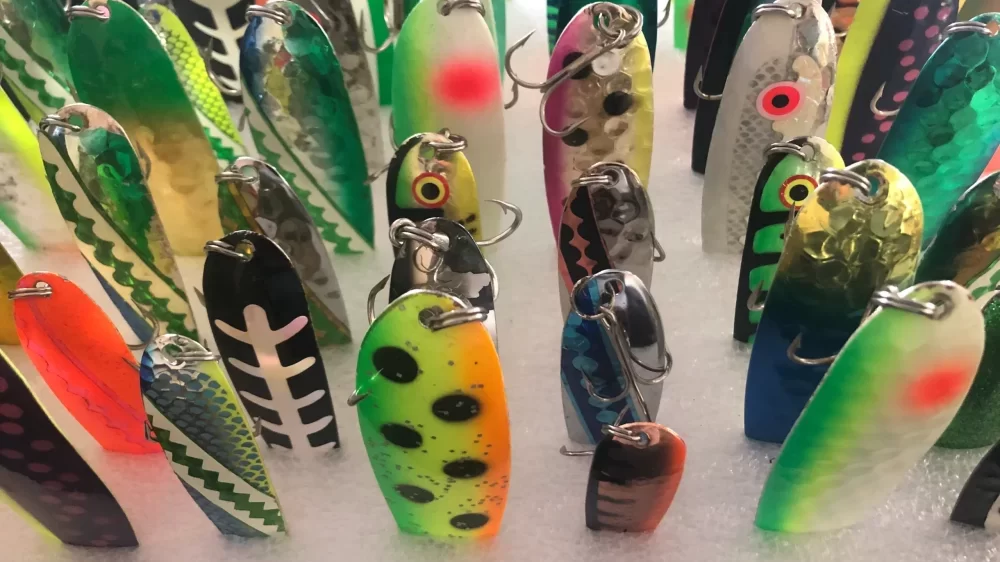
First, when the spoons are jammed together in a tackle tray, they tend to get scratched. The sharp hooks will do a number on the paint job of the spoons each and every time you are moving. Think about how much time that tackle is bouncing around both down the road on the trailer as well as the entire time out on the water. This will lead to having to repaint or replace them much sooner than you would need to otherwise.
The second disadvantage to this is that when these spoons are jammed together, it can be difficult to find the color combo you are looking for. We all know how frustrating it can be when our spoons are stuck together in clumps and we’re trying to sort through them to find the right one. There has to be a better way, right?
Here, I will go over our favorite way to store our trolling spoons. While it takes up a bit more space, it keeps the spoons from scratching each other as well as making it super easy to find the color combo you’re looking for quickly. All you will need is a storage tray that is deep enough to store the spoons vertically (about 6″ deep) and some polyethylene foam (or some other sort of high density foam material).
Step 1: Get a Sheet of Foam
A sheet of polyethylene foam can often be salvaged from heavy duty packaging. If you don’t have any from a recent delivery, you can purchase a sheet of it online. Polyethylene is what pool noodles are made of and is what we prefer, but any type of tough foam should work. We prefer a sheet that is 2″ thick, but you can probably get away with a little less.
Step 2: Choose a Storage Tray
The storage tray can be sized to fit your needs. The one we use is about 16″ x 23″. This holds our entire collection of spoons. Admittedly, we have a modest collection of spoons (about 100), and the tray size you select should accommodate your space/storage space. For handling, we don’t recommend a tray much larger than this, but you can always get a second or third tray, if necessary.
Step 3: Cut the Foam
First, simply cut the foam to fit the bottom of the tray. Next, cut a gridwork of slits in the foam to accommodate your spoons. The slit should be slight less than the spoon width so that you get a tight fit. Remember, you can always cut more, but you can’t cut less!
You should space them according to the sized spoons you will be storing. For salmon, we mostly troll magnum spoons, so we spaced each slit about 1.5″ apart in both directions. At 1.5″ spacing, we get about 56 magnum spoons per square foot. This equates to over 140 spoons in the 16″ x 23″ tray! Of course, they can be spaced closer together for smaller spoons allowing room for even more spoons. Optionally, you also can secure the foam to the bottom of the tray using a few pieces of double-stick tape, although, we did not find this necessary.
Step 4: Install LED Blacklight Strip Tape
To allow your glow-in-the-dark spoons to be activated and ready to go when you reach the fishing grounds, consider installing some LED blacklight strips in the inside of the lid. The power cord can by run through a hole punched in the lid, or simply run in between the lid and container (just be sure not to pinch it). These can then be rigged to plug into your boats 12 VDC to allow your glow-in-the-dark spoons to activate while you are in transit!
Understanding Sonar Frequency
* This page contains affiliate links. The Great Lakes Fisherman may earn a commission on items purchased through these links. For more on this, please click here.
So, you’ve purchased that nice, new, and very expensive sonar unit that will solve all of your fishing problems right? Now, if only you knew how to use it. Never fear, The Great Lakes Fisherman is here to help take away the mystery of the modern sonar unit. Understanding the basic principles behind sonar technology will make you more adept at taking advantage of the full capability of the unit. In this article, we will focus on better understanding sonar frequency based on what I have learned about the process.
What is Sonar Frequency?
Frequency is the measure of how often something happens. In the case of sonar, we are measuring the number of sound waves that travel past a given point per second. Sound frequency is measured in hertz and 1 hertz is 1 sound wave per second. The human ear is capable of hearing sounds in the 20 hertz – 20 kilo-hertz range. Today’s fish finders use frequencies in the kilo-hertz range (thousands of hertz) to higher frequencies in the mega-hertz range (millions of hertz). Many of these units use a range of frequencies which make them more versatile. But in order to take advantage of that versatility, it helps to understand how these different sound frequencies affect different objects (targets) under the water.
How The Waves Are Generated and Received
Sound waves from your sonar are generated in your transducer. The word transducer is defined as something that changes electrical energy into physical (mechanical) energy or vice versa. In the case of your boat’s transducer, it does both by using an electrical switch that either connects the transducer to the transmitting portion of the circuit (electrical to mechanical) or the receiving portion (mechanical to electrical). Let’s discuss these 2 phases in detail.
Transmitting Phase
The process starts by your head unit taking its 12 volts of DC power from your battery and converting it to an AC voltage signal. This AC signal is what is then applied to the transducer via the transducer cable. The AC voltage creates an alternating electrical force on crystals that are located inside of your transducer. This pulse causes the crystals to physically vibrate and the frequency of the AC wave determines the frequency of the vibration. This is literally the conversion of electrical energy to mechanical vibrations (sound waves) and is very similar to what happens inside of an audio speaker.
Like all sound waves, the waves radiate from the crystal in all directions. So in order to focus them in one direction, the transducer is designed to absorb these waves in directions that are useless (ie, upwards) and keep the useful waves focused in the directions that are useful (downwards).
So now we have pulses (or pings) of sound waves radiating downward from the transducer and penetrating the water column. Like any sound wave, once these pulses interact with a material that has a different density than that of the water, some of the wave energy will be reflected back. This is known as an echo. This is what your transducer turns back into electrical energy in the receiving phase.
Receiving Phase
During the receiving phase of the process, the energy conversion is reversed. So when the echo wave reaches your transducer, it imparts a vibration on the crystals in the transducer, which in turn creates an electrical pulse in the circuit. This is detected by the main unit and through some fancy signal processing, the unit interprets these pulses and displays them as an object on your screen. It uses the delayed timing of the wave to determine the depth of the target and analyzes the wave forms to determine other features of the object (density and shape, for instance).

Low vs. High Frequency Waves
So now that we understand how the unit is interacting with material in the water, how can we use this to our advantage?
Low frequency waves are able to travel farther than high frequency waves. This is because low frequency waves are less likely to interact with material objects and thus keep more of their energy than do high frequency waves. In fact, whales use these low frequency signals to communicate across thousands of miles in the ocean. This makes lower frequency waves on your sonar better suited for detecting deep water targets. Low frequency waves also produce a larger scan cone. So not only can you detect better in deeper water, but you can also scan over a larger area.

So what is the advantage of high-frequency waves then? With high frequency, you are trading off volume of the water column for detail. The higher the frequency, the more interaction you’ll get with targets in the water which can be used to produce a more refined image on your unit’s display. You may have noticed that the newer live-imaging units utilize very high frequencies in the mega-hertz range. This is because live imaging needs to continuously obtain minute details of a target in order to project its continuous movement on your screen. But in order to produce these high frequency pulses, these units require a lot more energy. This is one of the main reasons that these units will drain your battery so fast.
CHIRP Technology
Which frequencies are better to use then? As with most things in life, the answer is not that simple. And this is precisely why most units today have multiple frequency options. When choosing between options, we must decide what we are willing to trade off in order to get what we are looking for. Lucky for us, CHIRP technology helps us with having to choose by giving us a bit of the best of both worlds in a single view. So, what is CHIRP?
CHIRP, or Compressed High Intensity Radar Pulse, is a feature designed into many modern units that uses a range of frequencies over a longer pulse to give us a more clear visualization on the screen of what is happening. High CHIRP covers frequencies in the ~150–240 kHz range, while medium CHIRP covers the 80–160kHz range. Because the pulse includes a range of frequencies, it reduces some of the trade-offs by allowing us to see the results of relative high and low frequency interactions at the same time. Low CHIRP typically covers frequencies that are less than 80 kHz . This is useful in the deep oceans, but is not much use for inland fishing. For more on how CHIRP works, check out this article by West Marine.
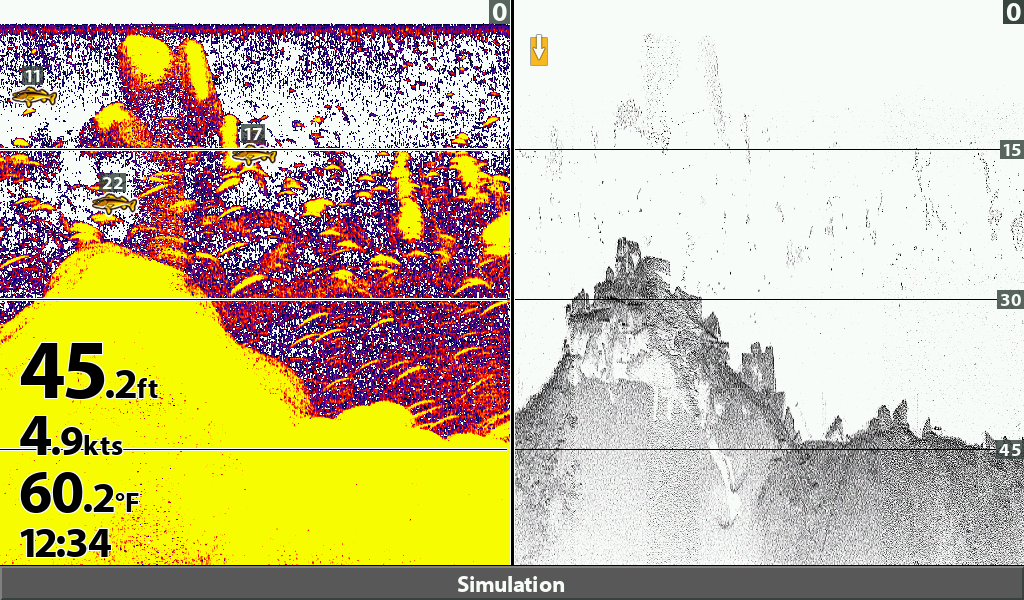
Down-Imaging and Side-Imaging
Down imaging and side imaging have become very popular in the last 10 years. So how are they different that standard 2d imaging? Down imaging is quite simply the utilization of high frequency pulses, taken over a very thin cone. In this way, the unit can put information together in a way that produces a clearer image. Think of it like this, instead of a single large cone of information with less detail, the unit will get the information by focusing on a smaller chunk of the cone with more energy and then sort of lace them together to form a more detailed image. Essentially, more of the energy is being focused on a smaller portion of the water column for greater detail. Side imaging works in the same way, but it directs the sonar pulses out the side of the transducer to produce images to the left and right of the boat.
Sensitivity Setting
The sensitivity setting on your unit has to do with how much of the signal coming from the transducer is displayed on your screen. The transducer is sending the signals, but the main unit is where the processing occurs. There is a processing circuit where that translates these signals to an image that makes sense to us humans. The sensitivity setting allows you, the user, to weed out or include weaker echoes should that you may not care about. This allows you to be able to better focus on the echoes you do care about. This is something that will likely need to be adjusted for each body of water, because each body of water has different amounts of suspended solids that can cloud your screen, making it difficult to see the targets that you are really interested in. There are many other settings (surface clutter, TVG, etc.) on your sonar that allow you to manipulate the transducer signal processing, but we will discuss those features in future articles.
Strategies on the Water
So with all of this information on frequency characteristics, how can we apply this to a day of fishing? Let’s break this down to some things that are very useful for us fishermen.
Locating Targets in Deep Water
While running on plane and looking for fish or structure, it is useful to utilize a lower frequency pulse or medium CHIRP. This is because we want to search the largest volume of water. Remember that low frequency produces the largest cone in the water and therefore “sees” a bigger volume of water than do higher frequency signals. Once we have found some targets, we can slow down, and as we zero in on them, switch to a higher frequency or high CHIRP setting to get more detail on what we are seeing under the water.
Zeroing In
Once you slow down your boat and start to focus on a smaller area, it may be helpful to switch to a higher frequency or high CHIRP. This will give you more detail. If you are seeing fish near the bottom, there may be more detail there than what your screen can show. This is when you’ll want to use your sonar’s zoom function to blow up that portion of the water column to better visualize what you are seeing.
Now let’s suppose that you have found some structure and you want to see more refined detail around that structure. If your unit has down-imaging capability, this is the time to use it. The down-imaging is for ultra-focus and although the beam is very thin, it will produce incredible detail. You may even see individual fish sitting within a brush-pile, or holding very tight to rocks, for instance. This feature is very important for fishing structure, the bottom in order to best distinguish a structural target from fish.
Finding the Thermocline
A thermocline is a region in the water column where the water temperature changes drastically with depth. This can often be picked up by your sonar, because a change in water temperature means there is a corresponding change in water density. You may need to play around with your sonar’s sensitivity, but the thermocline typically shows up better with your higher frequencies. The thermocline is usually present on deeper lakes with little to no current during the mid-summer months when the air temps and thus water surface temps are the warmest. A thermocline is present on most Great Lakes in the summertime. The thermocline is important because, below it, there is typically not much oxygen and thus not many fish. However, when the water gets warm in the mid-summer, a lot of fish will concentrate near the thermocline to find the comfortable temperatures while still having oxygen to breathe.
Locating Targets in Shallow Water
But what if you are fishing shallow water and are trying to locate fish & structure? This is where side imaging is the tool to use. With side imaging, you will be able to “see” fish and structure well off to the side of your boat, allowing you to find what you are looking for without scaring the fish. You can then approach your targets as discretely as possible. Side imaging can locate fish that are stacked up under docks and downed shoreline tree tops. If tuned in correctly it can also be used to locate spawning grounds for various species.
If you find this article helpful in your on-going quest to become a better fisherman, consider subscribing to our newsletter below. Also, please don’t hesitate to drop a comment regarding this article or any other feedback you may have for this site. Thanks for reading!
Setting Up a Small Boat for Salmon Fishing
* This page contains affiliate links. The Great Lakes Fisherman may earn a commission on items purchased through these links. For more on this, please click here.
Have you always wanted to chase big lake salmon, but weren’t sure that you had the space in your boat to handle the task? If so, this article is for you. Here, we will go over the things I have learned to optimize your layout for small boat salmon fishing. For the purposes of this article, we will define small boat as any boat with an 8′ 6″ beam or less, with no cabin (open-layout), and that is 20′ or less in length.
Equipment
To begin, let’s go over the trolling equipment that is typically used for salmon trolling. This can obviously be tailored to your boat based on how many lines you intend to run, the space you have available on your boat, and your budget.
Track System
While not necessary, a track system is highly recommended as it makes your boat layout much more versatile, allowing you to experiment with different layouts until you find the perfect one for your boat. Many owners choose to add them as options with their initial purchase and get them right from the dealer. But you can easily add these on later. If you’re on a budget, you can purchase longer sections of track and mount them yourselves. These tracks are made from aluminum and a good miter saw with a blade with 8-10 teeth per inch will cut through them like a hot knife through butter, allowing you to maximize the material by cutting them specifically for the available space on your boat. We use track from Bert’s Custom Tackle, but there are several different manufacturer’s that make tracks systems.
Downriggers
Having downriggers allows you to fish the lowest portions of the water column. While absolutely required for deeper water, downriggers aren’t really necessary if you spend most of your time fishing water in the top 100′ of the water column. If you are just looking to fish a time or two in the spring or fall each year, you can probably get away without them. But during the hot summer months, many of the salmon go deep and downriggers are about the only way to get down there.
If you are considering downriggers, a great budget option for small boats is the Cannon Uni-Troll 5 Kit. These units will get your baits down to 200′ which is likely deeper than you would ever need to go. When choosing a location for mounting downriggers, it is important to be sure that units are easily accessible to operate and that the boom gets the cannonball away from your boat without the likelihood of swinging back into the boat and causing damage. The Cannon Uni-Troll 10 has an extendible boom for situations that require one. The ideal placement of downriggers on a small boat is at the 2 back corners of the boat.
Downriggers can be mounted right to your boat or using adapters to mount to a track system. They can also be placed on swivel bases that allow you to swing the boom to the ideal angle for your setup.
Divers and Diver Rods
These are key items for smaller boats as they allow you to get your baits fairly deep (up to ~100′) without the use of downriggers. Dipsey divers are the most popular, due to their ease of use and versatility. Dials on the back of the diver allow you to set the angle the diver will dive away from the boat.
The depth of the diver is determined by the amount of line you let out, making a line-counter reel a must for these rods. A great choice here is the Okuma Cold Water Linecounter Trolling Reel.
For the rod, we use rods made for dipsey divers, which are typically made with a stronger backbone to handle the hard pull of the diver. But you can get away with any stiffer standard trolling rod for this. A good length for the rod is 8’6″ – 10′.
Weighted Lines and Planer Boards
A weighted line is a lead-core, copper or other wire line that will sink and go deeper the farther the line is let out. While I won’t be getting into too much detail on the difference between these (that’s a whole article by itself), just be sure that if you choose to use a weighted line, you get the appropriate reel to handle it.
In-line planer boards are the most popular way to use weighted lines. They allow you to spread the lines out horizontally from the boat, increasing the number of lines you can run at one time. This is where use of lead core and wire line comes into play because these tend to be the lines that will sit highest in the water column. Of course, you don’t need these lines if you intend to use plugs or other diving lures, but the weighted line will allow you to get as deep as 50 feet with your trolling spoons and flasher/fly combos.
As with the reels, the rods you need for your planer boards will largely depend on the type of line you choose to run. A standard 8′-10′ trolling rod can handle lead-core and standard mono or braid. However, should you choose to run copper wire, you’ll need to select a rod with stainless steel guides as the wire will damage the ceramic guides in a standard rod.
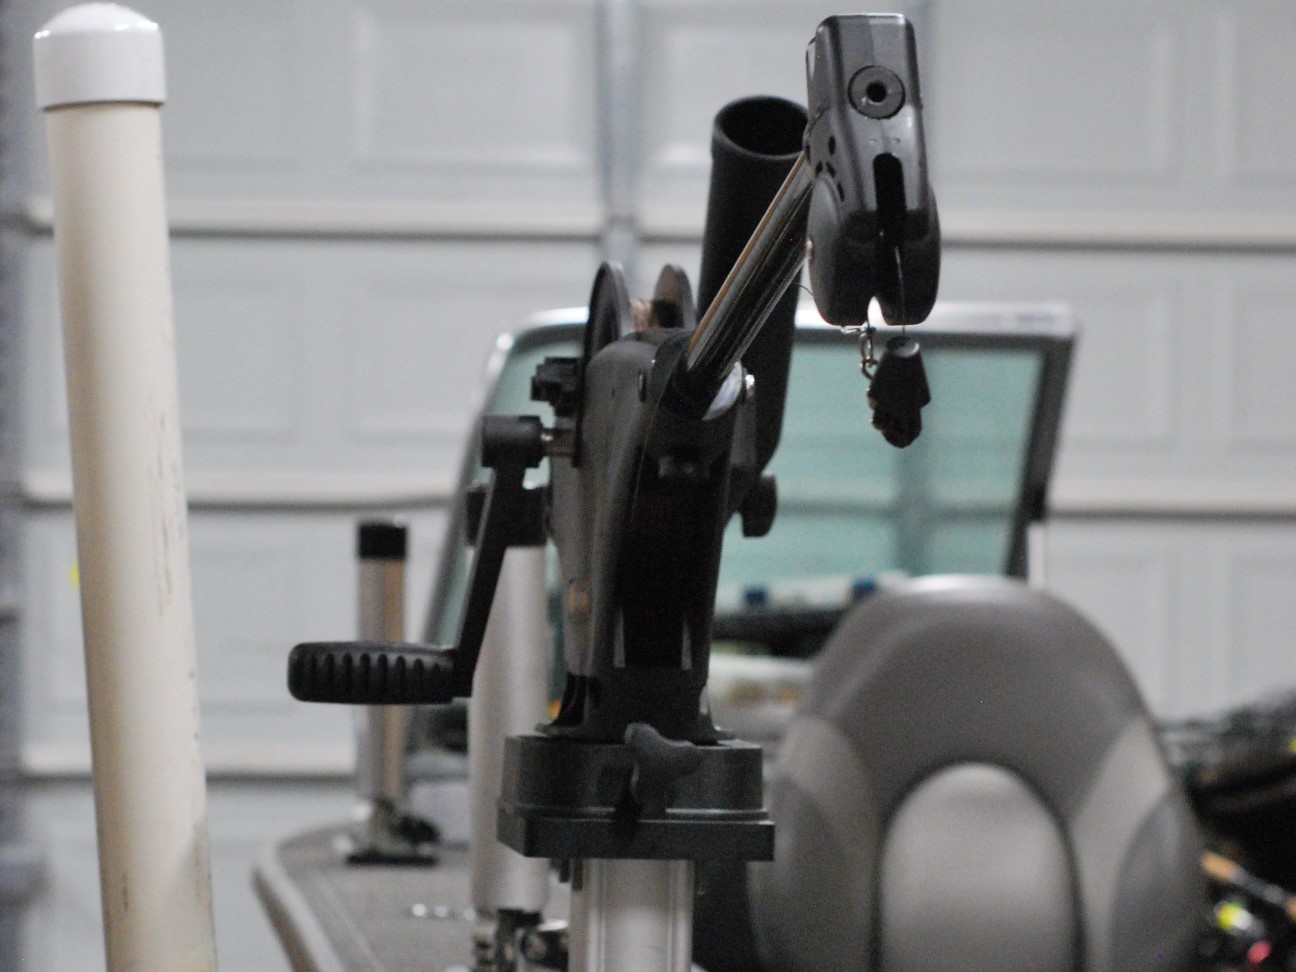
Rod Holders
In order to place your rods on the boat, you’ll need some fairly stout rod holders to handle the stress applied when a big fish hits. Typically, the downriggers come with their own rod holders, but you’ll still need some extras for your diver and planer board rods. A great choice for individual holders with track mounting is this one from Bert’s Custom Tackle. The ratchetting actions allows you to get the right angle for the rod while trolling, while also providing a place to hold the rod upright when running to and from your fishing grounds. Another popular way of handling rod placement is to use a rod holder tree which gives you the ability to stack the rods vertically. This works great for the planer board rods and keeps more of your rods near the back of the boat where they are more accessible.
Rod Layout and Spread
Now, let’s talk layout. Below is a diagram of the way a typical rod layout would look in a smaller boat. Starting from the back, downriggers are mounted on each corner of the boat. For small boats, 2 downriggers are ideal as there is not typically enough room to run more. Four downriggers are possible, though and if you intend to fish deep a lot, a second set just back of the first set along the side with an extended boom is often possible. This keeps the back of the boat open for landing fish.
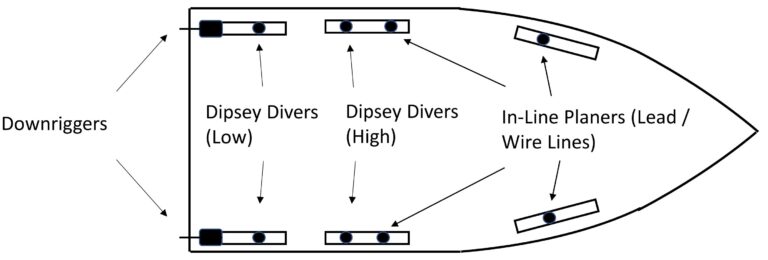
Behind the downriggers come the low and then high divers. These are the next highest in the water column. Finally, the wire lines on planer boards which should be the highest lines in your spread. You can really run as many of these as you like. You are really just limited to the spacing of rod holders on your boat (and of course, regulation restrictions). If you use a rod holder tree as mentioned above you will likely not need to place any rods in the bow section of your boat.
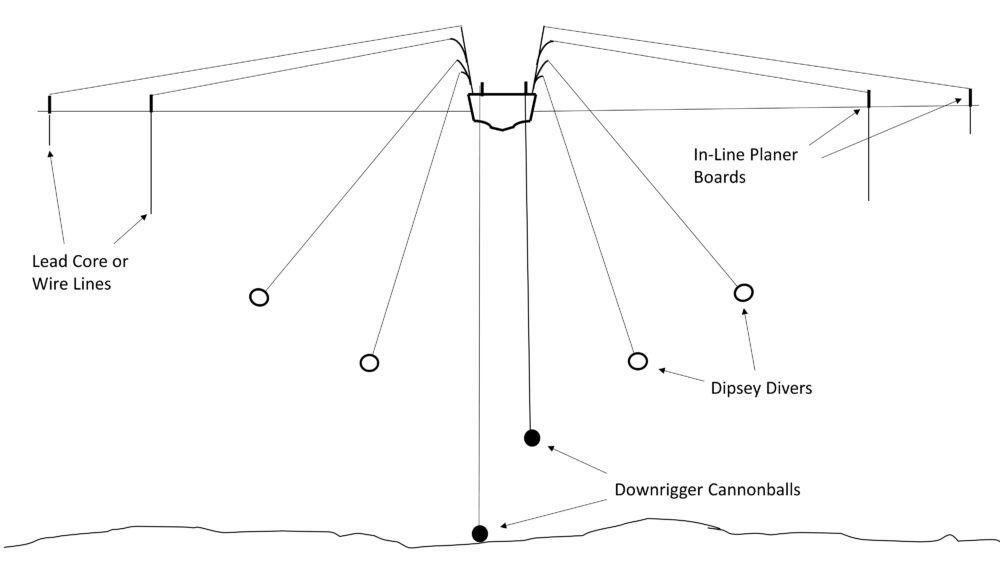
In the water column, the spread should form a ‘V’ pattern as depicted below. This puts your deepest lines straight behind the boat and your shallower lines out and away from the boat. Not only does this maximize the distance between the baits and your boat, it reduces the chances of tangled lines when a fish hits. This is because a hooked fish will tend to move up in the water column and towards the area straight behind the boat as that is the path of least resistance for the fish. Because each line it passes is lower in the water column, there is little chance of a tangle.
Other Considerations
Once you have all of the trolling gear laid out, you’ll need to consider room for a few other things.
Fish Storage
Some smaller boats have a built-in place for fish storage, but many do not. You need a pretty good sized cooler to put salmon in, and you’ll need to store it somewhere. The best place on these boats is in the bow area. This clears the back end of the boat, allowing for room to operate your equipment and fight and land fish. You’ll probably want to secure it somehow as having a salmon land in your lap after hitting a wave on the run back in is no fun.
The Net
You’ll also need a landing net large enough to land a salmon. This is again best stored in the front of the boat. A spare rod holder works best and can be placed in any open track you have up front.
People
The biggest limitation with small boats is the number of people you can have on board, comfortably. By the time you load the boat up with the appropriate equipment to make the trip worthwhile, it can start getting crowded if you have more than 4 on board. Of course every boat is different so depending on your layout and boat length, you may have room for 5, but for most boats, four is the most you’ll want before people start getting uncomfortable.
Boating Safety Tips for Fishing Big Water from a Small Boat
* This page contains affiliate links. The Great Lakes Fisherman may earn a commission on items purchased through these links. For more on this, please click here.
Think you need a 24’+ boat to safely fish the big water? Think again! With the technology and resources available today, big lake fishing is not out of reach for those with boats in the 16-22′ class. But while the great lakes are a paradise for those who love to fish, they can be dangerous if not respected. Read on for 5 tips to keep you safe on the big water.
Tip #1: Standard Safety Gear
Before thinking about getting your boat on these large bodies of water, be sure to have all of your standard safety gear up to date. This includes the following:
- Life Vests (Including a Throwable)
- Up-to-Date Fire Extinguisher
- Flares & Horn in Good Working Order
- GPS Unit
- A Well-Stocked First Aid Kit
- Small Basic Tool Kit
- Properly Working Navigation Lights
Tip #2: Communication
The ability to communicate is key. You should understand the cell coverage of your phone in whichever port you decide to fish from. You can check message boards and ask fellow fisherman for this if you live far from the lake. Fisherman are great people and while some may not want to give you the GPS coordinates of their favorite hotspot, I know very few who wouldn’t help with answering basic safety questions.
Ship to shore radios provide a great added feature even where cell coverage is good. In areas where cell coverage is limited or non-existent, a ship to shore radio is essential. You definitely don’t want to venture out into great lakes waters with no communication.
Tip #3: Know the Weather Forecast
Understanding the weather forecast for the day you plan to fish the great lakes is vital. There are many resources available these days to ensure a safe and enjoyable day on the water. There is simply no excuse for not knowing. Not only should the basic forecast for the day be understood, but the wind forecast is particularly important. Be sure to know the maximum wind speeds, including gusts, as well as the wind direction and how it might change throughout the day.
Tip #4: Invest in a Kicker Motor
A kicker motor is a second, small outboard motor (typically less than 25 hp) that can provide two major benefits. First, it can be your primary motor for trolling and save your main engine from running long hours at idle speed. Secondly, and more importantly, it can become a back-up motor to get you off of the water, should your main engine fail.
Tip #5: Know When to Pull the Plug
Understanding your limits and recognizing potentially hazardous situations is the one of the most important of these tips. The fish will still be there tomorrow and you need to ensure that you and your crew will be as well. Never venture further from port than your boat can handle. The smaller the boat, the closer to port you should remain. If your cell phone dies and you are 4 miles out, you may want to head a little closer to port. If any of your safety equipment fails or goes down, it might be time to get off of the water. And finally, the wind is your enemy. Modern forecasts are good, but they are not perfect. If there is any unexpected shift in the weather, it might be time to go. Waves on the great lakes can kick up in a hurry.
Following these tips will help ensure a safe and enjoyable day doing what you love!